

Given my obsession with tallow-based skincare, it kinda feels like a huge oversight not to have talked about rendering tallow yet.
It’s a surprisingly simple process that can be done at home with just a few basic tools.
What's so great about tallow?
Regular readers of Redheaded Herbalist already know the answer to this question! Quality pastured tallow is simply the best. thing. evah. It’s my most commonly used cooking oil and I use it as a base for all sorts of personal hygiene, skincare and wellness products.
“Tallow” refers to the rendered fat of a ruminant animal — usually a cow, deer, sheep or goat. It’s a super nourishing fat and a great source of conjugated linoleic acid (CLA). This is particularly true of grass-fed/finished cows, which produce fat-soluble vitamins A, D, E and K and CLA in higher concentrations (all of which are excellent for your skin, inside and out!)
Tallow is a highly stable fat composed of a mix of saturated, mono and polyunsaturated fatty acids (approximately 50% monounsaturated, 43% saturated, 4% unsaturated, 3% “others”). Its high smoke point makes it a safe choice for frying and cooking at higher temperatures.
Why render your own tallow?
You can buy tallow at just about any grocery store, so why would you want to go to the trouble of rendering your own at home?
For starters, quality. Many brands of store-bought tallow are made from “conventionally” raised cows who spent their short lives in a Concentrated Animal Feeding Operation (CAFO) and are typically pumped full of hormones and antibiotics.
But even if you find an ethical, high-quality source of rendered tallow, increasing costs are making it harder and harder to justify the convenience. For years, I’ve faithfully purchased a 5-gallon bucket of tallow from US Wellness every Black Friday when it was 20% off.
Not so many years ago, 5 gallons of high quality tallow used to cost me around $99 delivered — $80 during a good Black Friday sale. Since then, the price has increased about 200% and it’s becoming increasingly difficult to justify.
Fortunately, we have options! Rendering your own tallow from beef fat is far more cost-effective. I can get a 10# bag of pastured beef fat from my local rancher for around $2-3 a pound.
It’s also a great way to make use of an often-overlooked resource. Saving the fat from an overly fatty roast costs nothing. I used to avoid buying those enormous untrimmed briskets because of the hassle of removing all that fat myself — now I see it as an excellent value add!
Wet vs dry rendering
There are a couple of different ways to render beef tallow. “Rendering” in this context refers to the process of melting down the raw fat to separate the oil from the meat and connective tissues.
For this tutorial, we’re going to focus on the ‘wet’ rendering method, because it seems to produce a cleaner, more neutral smelling tallow. The dry rendering method, which (as the name suggests) involves melting the fat in a dry pot, is fine for tallow you’re going to cook with, but for tallow you’re going to use in skincare products, I believe the wet method is the way to go.
Ingredients & equipment
The equipment is super basic: A large stainless stock pot, a fine mesh strainer, some cheesecloth, cutting board and a sharp knife is all you really need.
You’ll need to source some beef fat from your local farmer or butcher. High quality tallow can only come from high quality fat, so for best results, try to find a source from grass-fed, pasture-raised cows that have not been contaminated with hormones and antibiotics. The quantity is up to you, but expect to end up with roughly half as much tallow (by weight) as the fat you started with.
You’ll also need a clean source of water (preferably filtered) and some salt.
Salt or baking soda?
Salt and baking soda are both used in the rendering process to assist in drawing out impurities and moisture from the fat, resulting in a cleaner tallow. I prefer salt over baking soda for a couple of reasons:
If you heat fat in water long enough, there’s a slight chance that some of the fat will undergo hydrolysis and break down into free fatty acids. Throw in an alkali — even a weak one like baking soda — and some of the fatty acids may saponify. Whoops! Now you have soap in your tallow. (Although the superfat may be a smidge higher than you’d normally like, lol)
Baking soda can also lead to a chemical reaction with the slightly acidic fats and produce carbon dioxide. The reaction is harmless and won’t affect your final product, but too many CO2 bubbles and you can wind up with quite the mess!
So I use salt. Choose a non-iodized salt since iodine can discolor the fat and give it an off-flavor. Plain sea salt is a good choice and is less likely to affect the color or flavor of the finished tallow.
Rendering tallow
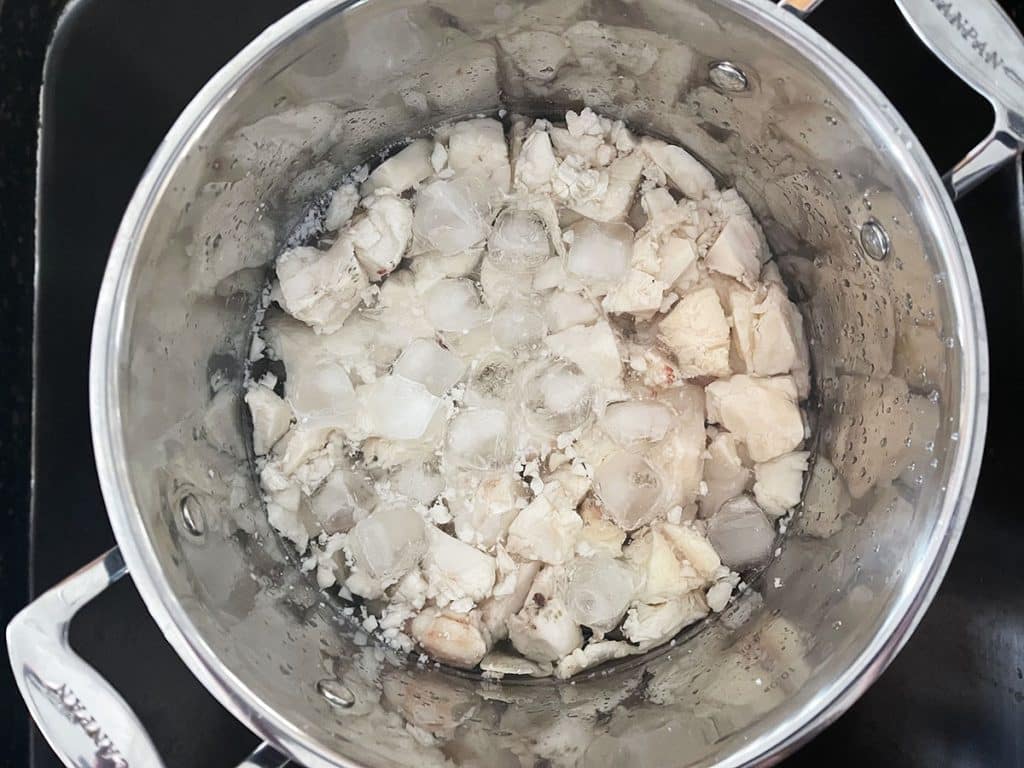
Place your fat into a large pot or bucket and cover with ice water and let everything soak for an hour or two. This step is optional, but a pre-rendering ice bath helps to remove impurities, blood or other debris from the fat. It also reduces the temperature of the fat, firming it up to make it easier to chop or grind.
Discard the soaking water.
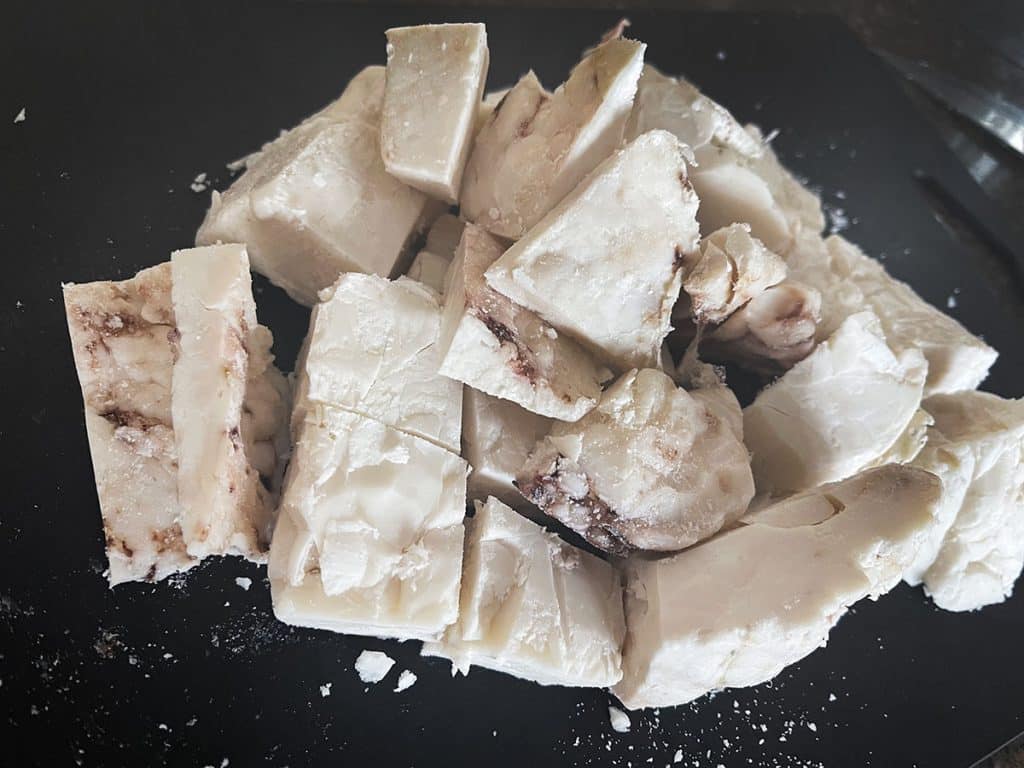
If your fat is in large chunks, you’ll want to cut it into small 1”-2” pieces. This is easier to do if the tallow is still cold or even partially frozen. It’s not strictly necessary to make the chunks super small, but smaller pieces do speed up the melting process and reduce the risk of accidentally scorching your fat. If you prefer ground fat, you can ask your butcher to run the fat through a grinder for you, or you can do it yourself with a food processor.
There are different schools of thought on whether it’s necessary to grind your fat ahead of time. Harder, solid fat such as suet, will benefit from being cut into smaller pieces to help it melt more quickly and evenly. For softer fat like trimmings or scraps, you may find that cutting it into tiny pieces is unnecessary.
Place the chopped/ground fat into a large pot. You’ll want to use the largest pot you have aim to fill it no more than 1/2 full with fat and water. As the fat melts during rendering, it will release water that was stored within the fat, resulting in a larger volume of liquid than you may have expected. According to Captain Obvious, greasy water is no fun to clean up of your stove, cabinets, floor etc.
Add just enough water to cover the tallow plus approximately 1 tablespoon of salt per pound of fat. I started with 5 lbs of fat, so I added ~5 tablespoons of salt to the water
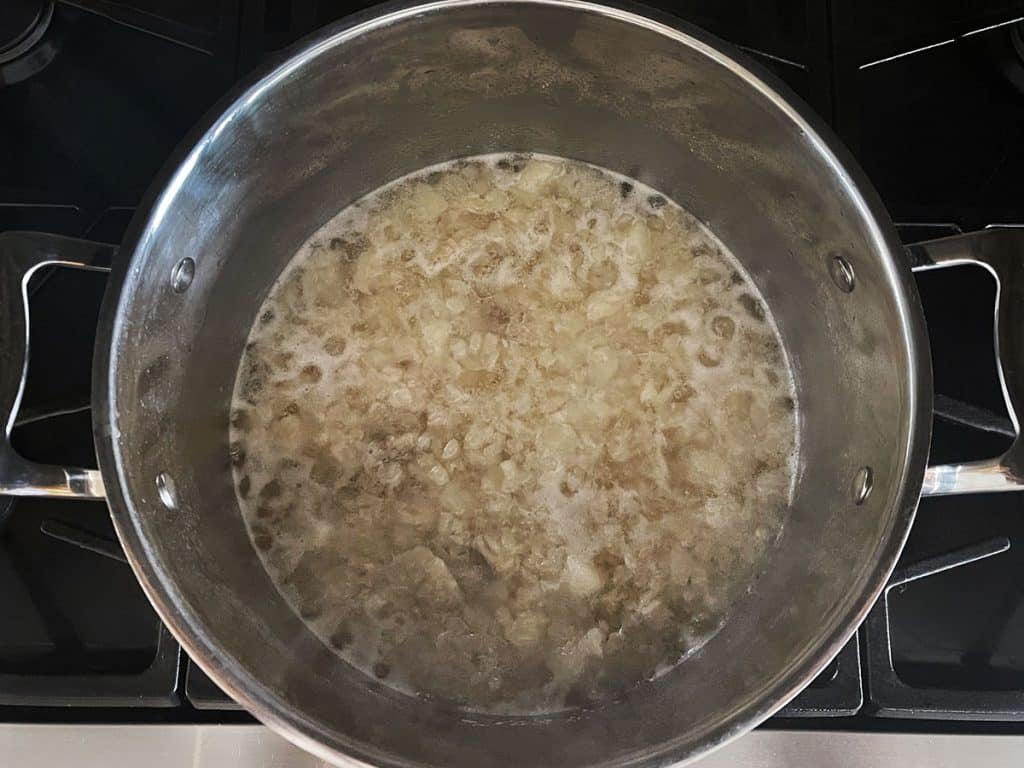
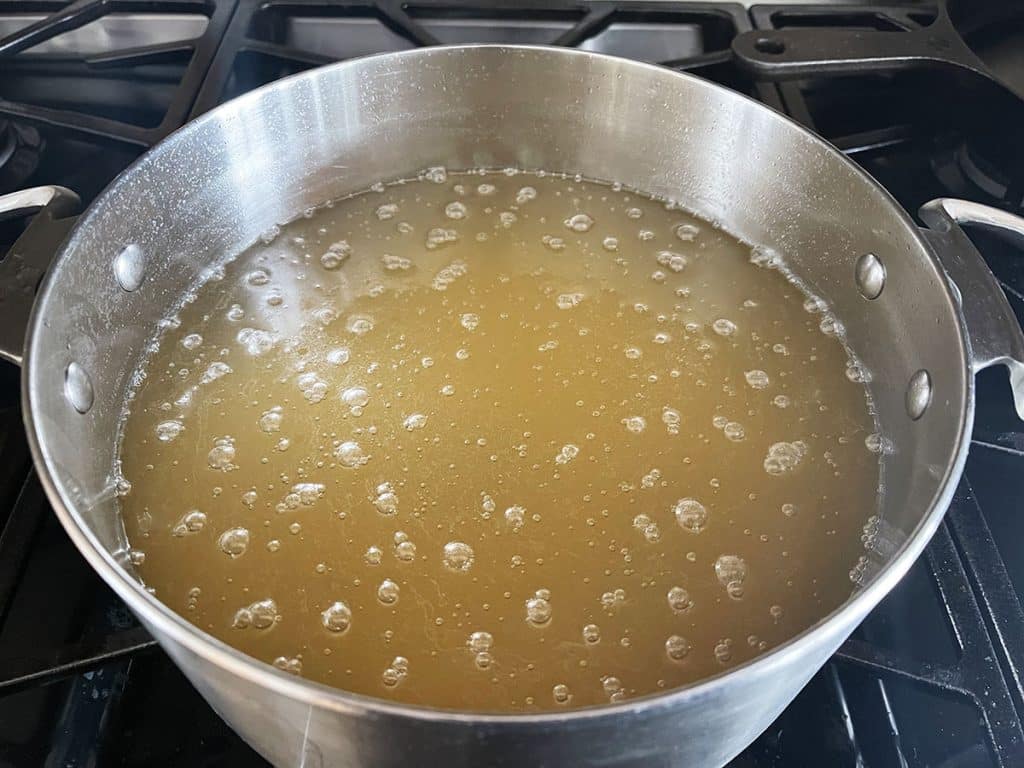
Over medium heat, bring the fat/salt water mixture to a light simmer. Keep the heat slow and low, stirring every so often to allow the fat time to gently melt without scorching, which is key in preventing any lingering beef smell and creating a nice neutral tallow.
Simmer until all you have is melted tallow in water with bits of meat and gristle floating on the surface. The size of your cut fat will determine how long the rendering takes. Ground fat may take only a few hours while larger pieces will take longer. For longer renderings, you may need to top up the water once or twice if it gets too low.
Some tallow makers recommend simmering until all you have left is brown bits of gristle floating on the surface. I usually call it ‘done’ before the fat solids get overly browned. This seems to reduce the amount of beefiness in the tallow, so it requires fewer rounds of washing later.
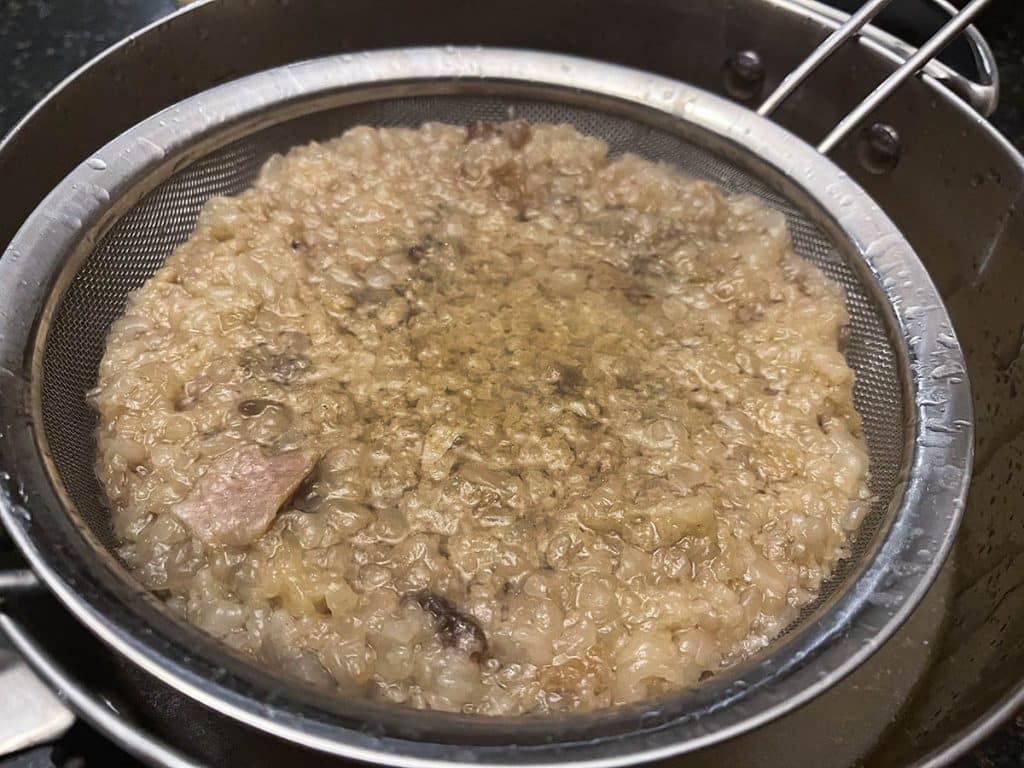
Cut the heat and carefully strain everything through a fine-mesh strainer to separate the solid bits from the liquid. (Remember, this isn’t just hot water — it’s mostly oil and it will not be a good day if you spill or splash some of it on you.)
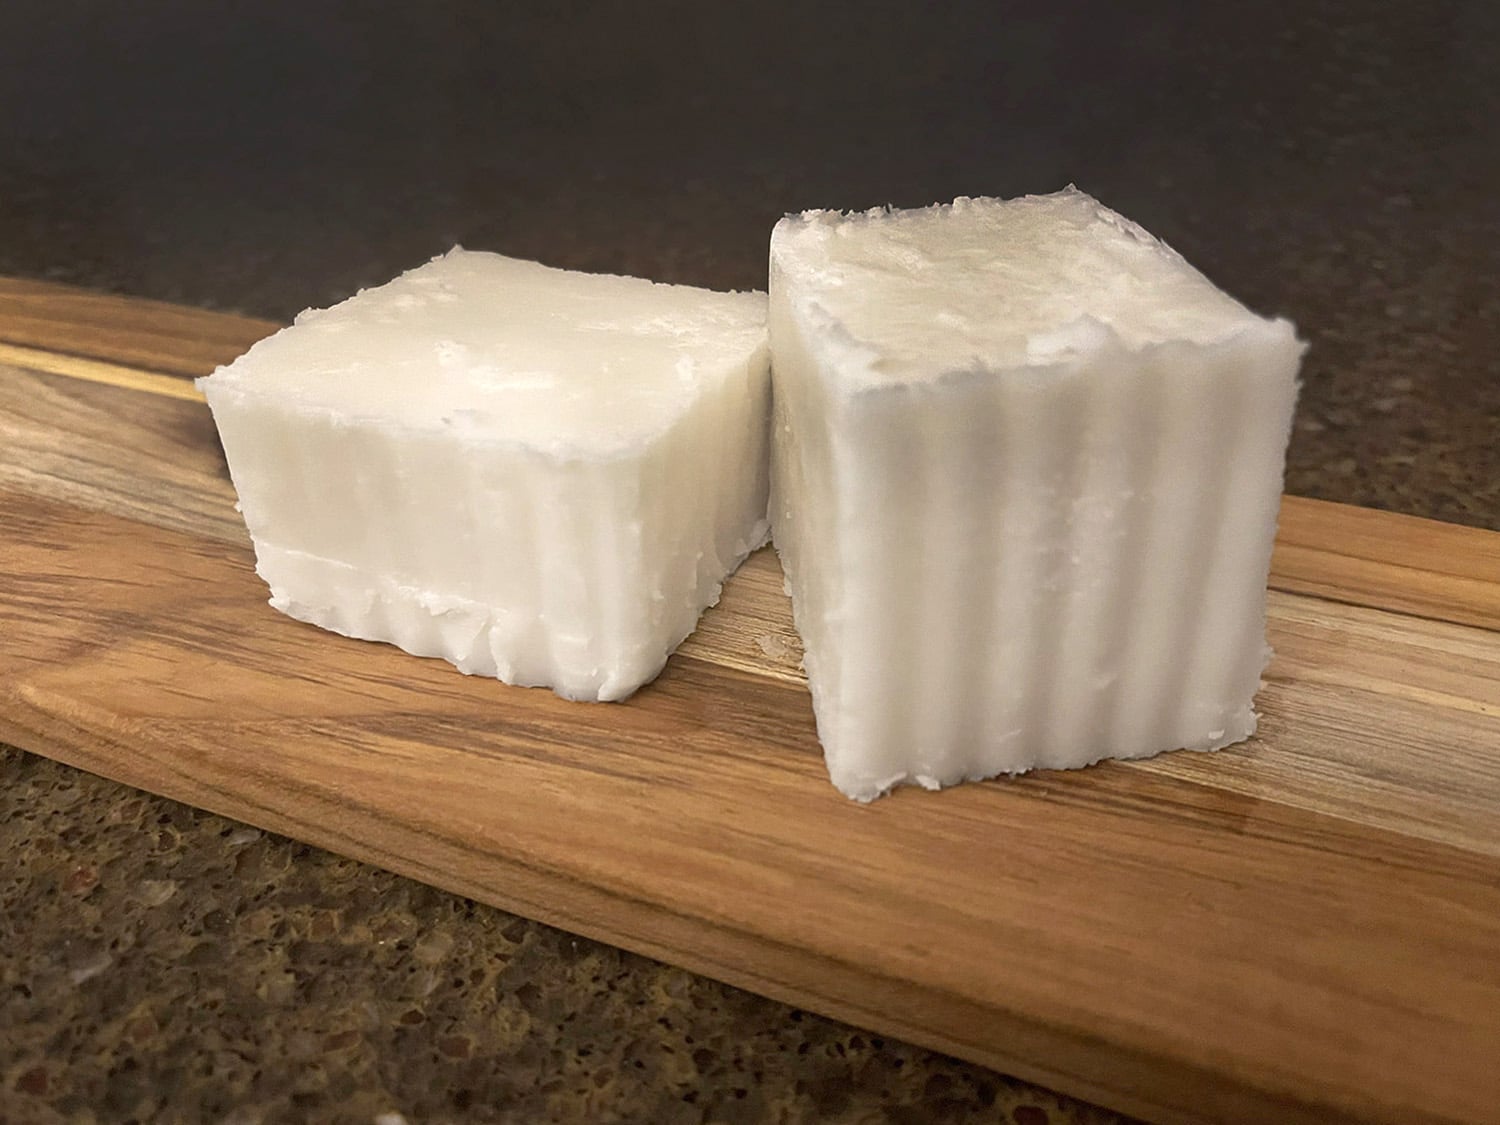
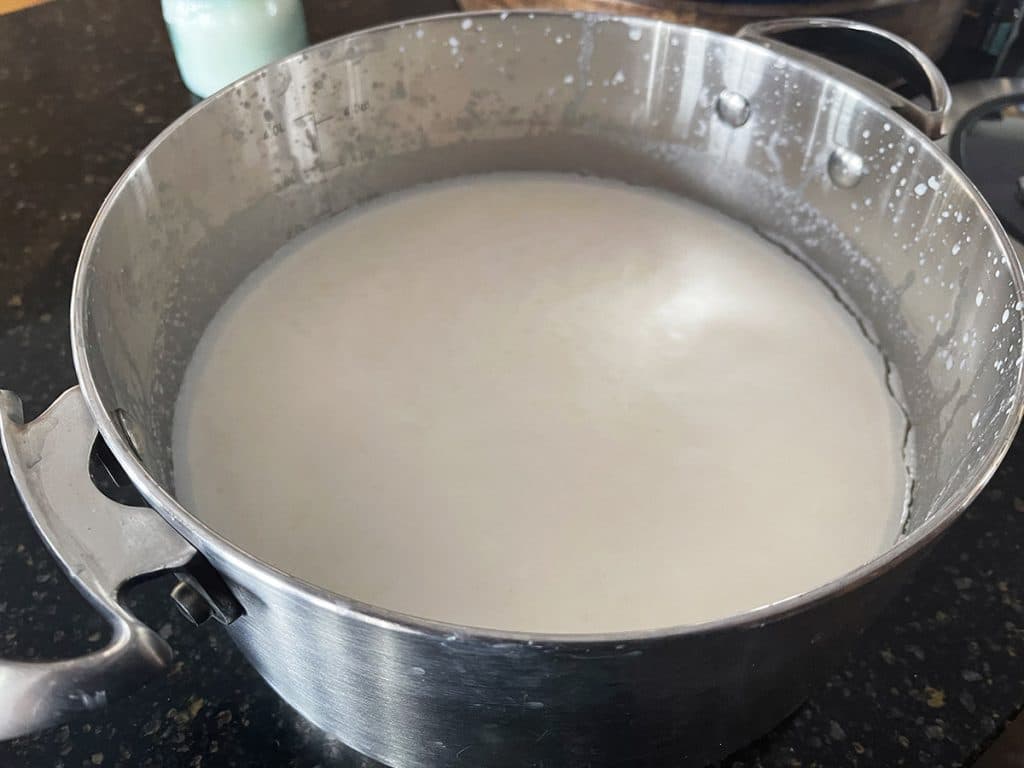
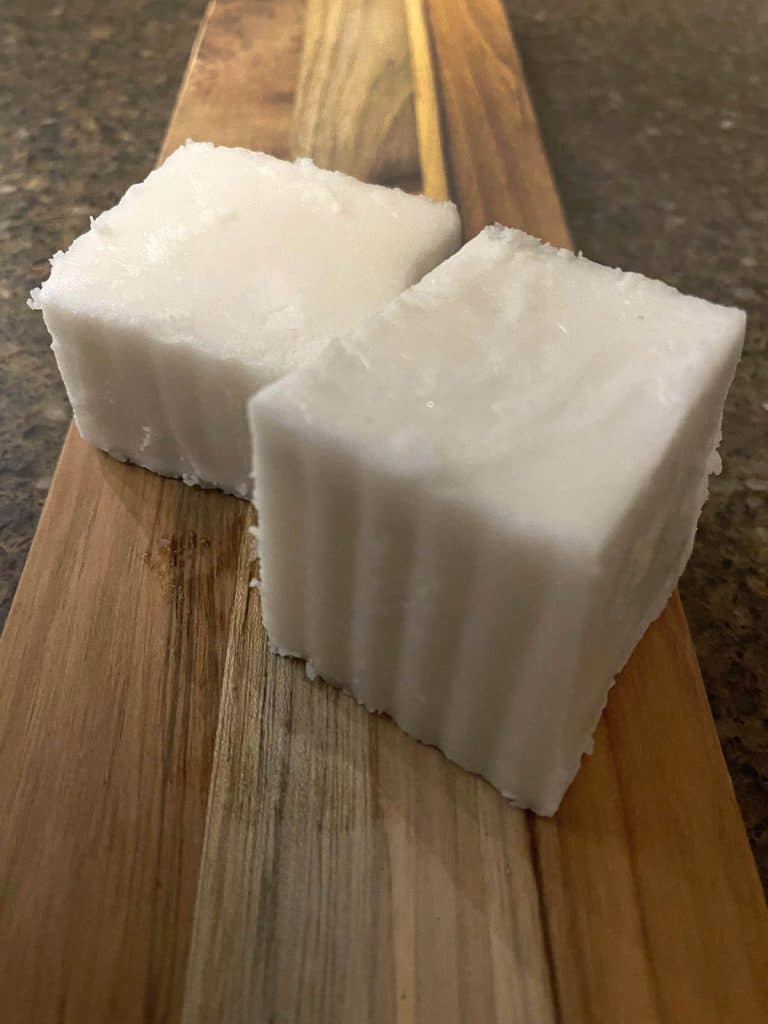
Strain the liquid once more through a cheesecloth-lined strainer to catch the smallest particles. A coffee filter or even a paper towel will work too. When it’s had a chance to cool off a bit, cover the pot of liquid fat and transfer it to the fridge or other cool storage location to harden. When completely cooled, you should have a solidified disk of white tallow formed on top of the water.
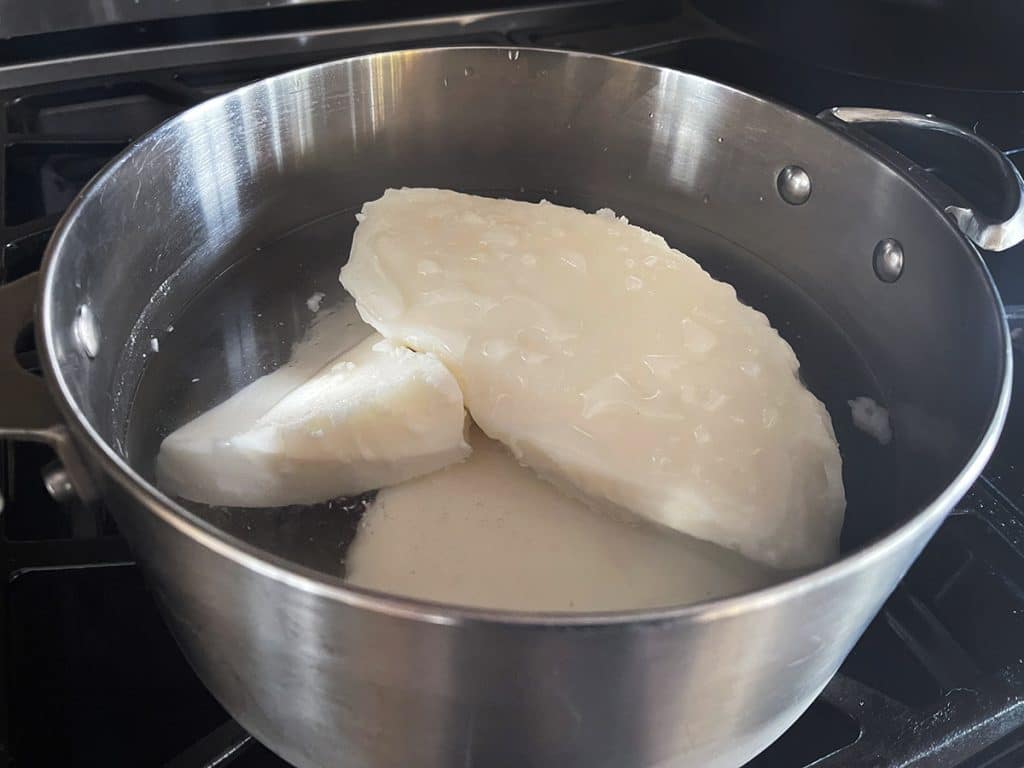
Use a knife to pry the disk out of the pot. I’m rarely able to get it out in once piece, especially if it’s on the thicker side. Run your knife around the perimeter of the disk and cut it in halves or quarters if you need to. Rinse the block(s) of tallow under cool running water and scrape off any brown spots.
Purifying tallow
You could technically stop here. My first run tallow was nice and white but still smelled faintly beefy. If you’re looking for a very pure tallow for use in skincare and soap, you’ll probably want to further purify the tallow.
Simply return the disk of tallow to your clean pot, cover with fresh water and a couple of tablespoons of salt. Melt the tallow in the salt water over gentle heat, stirring occasionally. When everything is liquified, strain once more through a cheesecloth-lined strainer and transfer to a cool place to let the tallow disk reform.
I was happy with my tallow after a couple of washes, but you can repeat this step as many times as needed to get the neutral, pure white tallow you’re after. Purifying can fix rendering mistakes too. If you accidentally burnt your tallow in the first stage, you can often salvage it via multiple rounds of purification.
If you’re planning to use the tallow for soap or skin care projects, you might be wondering about residual salt in your finished tallow. Since salt is water soluble, it leaves with the water when you strain it out. There should be very little moisture left in your finished tallow, so virtually zero residual salt.
Finishing steps
IMHO, wet rendering is the best way to get clean, neutral tallow for use in skincare products. That said, it’s also true that with wet-rendered tallow, there’s a non-zero percent risk of your tallow retaining small amounts of water, which can lead to spoilage or bacterial growth over time.
To reduce this risk, you can gently reheat the cooled solid tallow alone (without any added water) on low heat. This should allow any remaining water to evaporate. Be careful to avoid overheating, though, as high temperatures can damage the quality of the fat. Pour the tallow into a wide, shallow container to cool. This increases surface area and encourages any residual moisture to evaporate as it cools.
After solidifying, inspect the bottom of your tallow puck for any visible moisture or wet spots. If you see any, repeat the reheat and cool process until the puck appears completely dry.
Storage
Let your finished tallow air dry before transferring to an airtight container for longterm storage. My 5 lbs of beef fat yielded approximately 2 quarts of purified tallow.
Some recommend storing tallow in the refrigerator or freezer and give it a lifespan of only a few weeks to a few month. I’ve kept my 5-gallon buckets of tallow from US Wellness at room temperature for literally years with no signs of spoilage.
Longevity depends on how well the tallow was purified. If there is any tissue or moisture remaining, it will promote spoilage. The pure fat, on the other hand, should last a good long time.

There you have it! The whole process is actually quite simple, isn’t it?
Let me know if you try rendering your own tallow, and what you use it for! My latest “thing” is making tallow-beeswax candles, which will likely end up as a future post… Stay tuned!

44 Responses
Super informative. Thank you!!
Thanks Heather! ♥
I accidentally used ionized salt- it looks white and smells good but should I be worried about using it for skincare stuff? Or can I purify it out if I put it through more purification runs with heating with water?
Hi Kesslyn! If your tallow is white and smells nice and neutral, I think you’re okay. Beef fat contains small amounts of iodine naturally, so I really can’t imagine a little extra iodine from a few tablespoons of salt would be that big a deal… If you want, you might try to remove some of the iodine through an extra round of purification, but I honestly wouldn’t worry about it too much. ♥
For the most part we don’t get enough iodine in the North American diet. Iodine is essential for Thyroid health. It was highly recommended to me to use iodized salt in making my tallow.
Hi Sarah, You’re absolutely right that iodine is important for thyroid health – and it’s true that many people don’t get enough. That said, using iodized salt in tallow rendering isn’t really a meaningful way to address that. The amount that would carry over into the finished fat is quite small and inconsistent, especially after heating and purification. So it’s not something I’d rely on as an iodine source. My recommendation to use non-iodized salt is really just about preserving the quality of the tallow – keeping the color clean and the scent as neutral as possible. Iodized salt can sometimes interfere with that.
If someone prefers to use iodized salt, it’s not going to “ruin” the tallow or make it unsafe—it’s just not ideal if you’re aiming for a really refined end product. And if iodine intake is a concern, there are much more reliable (and measurable) ways to get it through the diet. Hope that helps clarify where I’m coming from 🙂
I’ve been rendering tallow for a while now. I do the wet method and usually twice and sometimes add salt. This time I added baking soda and it started to bubble! Almost out of my croc pot! Does that mean it is starting to turn to soap? Can I still use to make soap? Does that change my soap recipe at all? Thanks!
Hi Laura! It’s possible you had a little bit of saponification happen, but I think it’s pretty unlikely at the temps you get in a crockpot. More likely, you had a harmless chemical reaction that produced some CO2. The alkaline baking soda can react with the tallow fat (which is slightly acidic) producing foaming and bubbling. Either way, I doubt it will affect a soap recipe.
I did the wet method (have once before with prefect results) and this time it is soft and almost “grainy”. Is was very clean, ground tallow from our own steer….trouble shoot? Help! I am rendering again to see if I can fix it…..ideas?
Hi Ronna, I haven’t experienced this with my tallow, but I think you can minimize graininess by cooling the tallow more quickly after the final render. When salves get grainy, it’s typically because fatty acids with higher melting points solidify before the fatty acids with lower melting points can catch up. I think it might be a similar situation for the tallow. Tallow is a mix of saturated, mono and polyunsaturated fatty acids, which all have different melting points. I would try re-heating the tallow and then cooling it in a colder environment. Please let us know how it goes!
I read the comment about graininess and this happened to me as well. But I realize I used way too much salt and it didn’t end up separating in the final purifications. I thought adding more salt would clean it more…..now it’s just making the whole process a lot longer!
Thanks for your guidance Heather!
I’ve just had the same issue. First time wet rendering with baking soda and it set all soft and grainy. Also trying to render again with just water to see if it fixes it. Did you manage to fix yours?
I have just started rendering by beef tallow to get rid of the odour for face moisturiser, but I’ve only put my jar, with the tallow still in it, in a pot of water and let it slowly melt over 4hrs then take it off. Will this make a difference then putting the tallow in water with salt?
Hi Tahlia, Simply melting the tallow in a jar within a water bath won’t do anything to purify it. Washing tallow with water and salt is more effective at eliminating odor. Salt helps to draw out impurities and water acts as a medium to carry those impurities away. When you mix melted tallow with salted water and let it cool, the impurities settle into the water layer, which can be discarded.
What did you tallow look like to start? if it was in a jar, it may already be rendered. Rendering refers to taking the raw fat from the cow and melting/purifying it
I rendered beef tallow today… I did it the dry method. I put it in my plug in roaster oven outside (to keep the smell outside) at 200 degrees F at 11:00 AM and then totally forgot about it until 9:00 PM. Didn’t even stir it once. Now I’m worried I burnt it. Everything was liquified except for some very browned, crisp pieces of meat.
Hi Marcia, It depends on how badly burnt the tallow is, but I would be tempted to try improving it with a round of wet rendering. Strain out all of the burnt pieces and then proceed with the wet rendering instructions using 1 T salt per lb of fat. Worth a try!
I bought some bison tallow that is too hard to work with or turn into my usual face balm. Can this be remedied by wet rendering it again myself to soften it and whiten it or will it just get even more firm?
Hi Rebecca, I think re-rendering is unlikely to significantly change the firmness of the fat itself, as bison tallow naturally tends to be harder due to its higher stearic acid content compared to beef tallow. To make it more workable for your face balm, you might consider blending it with other softer oils, like jojoba or olive. This should give you a softer consistency without altering the overall properties of the tallow too much.
My tallow didn’t harden into a solid disc overnight and there was nothing to scrape off bottom. It looked pretty clean and white and virtually no odor was present. I did the slow cooker wet method. I’m on my second render. I guess it’s not a big deal if it didn’t harden well to be removed in a disc.?
Hi Kris, I don’t think it’s a huge deal if your tallow didn’t harden into a solid disc, especially since it’s clean, white and has minimal odor. Temperature or the ratio of water to fat can sometimes affect how well it solidifies. Since you’re on your second render, that should help clear it up even more. As long as the tallow is clean and you can separate it from any remaining water or impurities, it’s perfectly fine to use!
Hello! I brought some organic beef cooking tallow that I needed to purify as it was a bit smelly. I followed your method but my crock pot never reached boilling / bubbling point at all. Does this matter
Hi Bella, The salt in the water likely drew out impurities, even if your crock pot didn’t reach a simmer. While simmering enhances the process by encouraging more interaction between the water and the odor-causing compounds, adding salt can still achieve a reasonable degree of purification at lower temperatures. The test will be in your results… does your tallow look/smell any better than it did? If so, then maybe the crock pot did the job. If not, consider trying again using a pot on the stovetop. Good luck!
I keep seeing that wet rendering provides a much higher likelihood of bacterial contamination than dry rendering, as does whipping. With the sudden surge in homemade tallows for sale, I’m hard pressed to find any skin balms that are dry rendered balms instead of wet rendered whips.
Hi Courtney, I’d venture a guess that most makers of tallow-based skincare products use wet rendering methods in order to achieve a neutral clean-smelling tallow that is difficult to get via dry rendering. It’s true that wet-rendered tallow can retain small amounts of water that can lead to spoilage or bacterial growth over time. To reduce spoilage risk, you can gently reheat the cooled solid tallow alone (without any added water) over low heat. This should allow any traces of water to evaporate. (Be careful to avoid overheating, though, as high temperatures can damage the quality of the fat.) You can also pour the tallow into a wide, shallow container to cool, which increases surface area and encourages any residual moisture to evaporate.
As for whipping, tallow is a pretty stable fat – predominantly made up of saturated and monounsaturated fatty acids that are far less reactive with oxygen compared to polyunsaturated fats – so the extra exposure to oxygen via whipping should have a minimal effect (especially if stored properly in a cool, dark place). So while a whipped tallow might technically oxidize a bit faster than unwhipped, this difference is pretty negligible in most cases, and it should still remain stable for a long time without spoilage.
hello i enjoyed reading this… i’ve noticed that if i do dry render then my tallow cools really hard. I did your process with wet method and i did crockpot first with water and salt and then i reheated again on stove w water and salt and let simmer for an hour each time taking the fat disk and pouring out the salt water and scraping impurities. The third time i just heated it to melt and put in a glass vase and then looked for a water/oil line but didn’t see one…:: i put it in the fridge but it is not getting that nice hard texture like dry method it is staying soft and even looks a bit grainy but isn’t grainy to the touch. any advice? i really like the result i got from the hard tallow mixed with jojoba and whipped… it set nice and my friends loved it … this new version is okay but im not obsessed w it . The only plus is it doesnt smell….. i don’t want product to go bad if i sell it but i also think people wont like the beef smell …
Thank you for this article! Very informative and easy to follow! Please let me know when you start the tallow and beeswax candles!!!
Thank you for the kind words, Lisa! I hope to get to the tallow candle post soon!
So I just made beef tallow using the wet rendering process but my tallow did not form any disc over the water, like there was no water at all. Everything was solid. So I scoped out the sloid tallow and it was very pure like I saw no impurities at the bottom, also it had a very faint beef smell. So my question is did I do something wrong and why wasn’t any water left?
Hi Shallum, It’s difficult to say for sure from a distance, but if the tallow has fully solidified and there’s no visible water left, it might mean that there was not enough left after the simmering stage to form a distinct layer after cooling. If it looks and smells clean, then maybe it doesn’t matter and you can call it done, but if not, I would be tempted to try another wash with more water and/or simmering it for less time (so as not to boil off all the water). Does that make sense?
Hi!!! Is it possible to make tallow from the fat from the bone broth or meat broth. After 24hrs cooking I get a disc of fat at the top of my jelly broth, although it looks the same is very strong in smell.
Would rendering help the smell issue so I can use it for cooking and skincare???
Yes ma’am! The fat that rises to the top of bone broth is perfectly usable, and rendering it should effectively neutralize the beefy odor. Since you’re probably only getting small amounts of fat from each batch of broth, you can store it in the freezer until you accumulate enough to render in one go.
I am just learning on how to make tallow at home, thank you for all your beautiful comments, learning a lot from it, Lina
Thank you for the kind words, Michelina! ♥
I have a small tallow skincare biz and this was so helpful! So glad I found your site!!!
Oh, I LOVE to hear this, thank you! And love that you’re out there getting tallow to the people 🙌 ❤️
Amazing, thank you for this information and progress. I did 100 gram. 🫶🏽
Thank you for the kind words! 🥰
I purchased grease fed tallow that is more yellow than white. I purified with salt water but it is still yellow colored. It came from a reliable farm
I mean grass fed
Hi! A yellow color is completely normal for grass-fed tallow and is often due to carotenoids from the cow’s diet. The shade can vary depending on the breed of cattle, what they were eating, the season and where the fat came from. Salt-water purification removes impurities, but it won’t necessarily remove those naturally occurring pigments.
As long as the tallow smells fresh, has no signs of spoilage and came from a source you trust, I wouldn’t be concerned. White tallow is not necessarily purer or better than yellowish tallow. ♥
Love this site. Only discovered you today. I hope to create some basic products. So excited.
Hi,
Very important question— I get my tallow from a friend who works at a butcher. Only problem is that it’s soooo super stinky when I get it from her & i really don’t understand. It’s horrible. I tried rendering a part of it and it turned out a little better, but the undertone is still a pretty stinky. They try some sort of rendering themselves there, but she said maybe something went wrong. What is your view on this?
Hi Sophie, Properly rendered tallow may have a faint beefy scent, especially while it’s warm, but it should definitely not smell horrible. If the rendered tallow smells strongly unpleasant, the raw fat may not have been fresh when it was rendered or the finished tallow may contain residual tissue or moisture allowing it to spoil. A few rounds of wet rendering with fresh water and salt can remove residual impurities and reduce an ordinary beefy or slightly scorched smell, but it can’t make spoiled or rancid tallow fresh again. I would trust your nose and not use it for food or skincare.