

Print
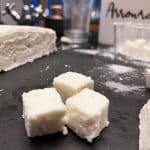
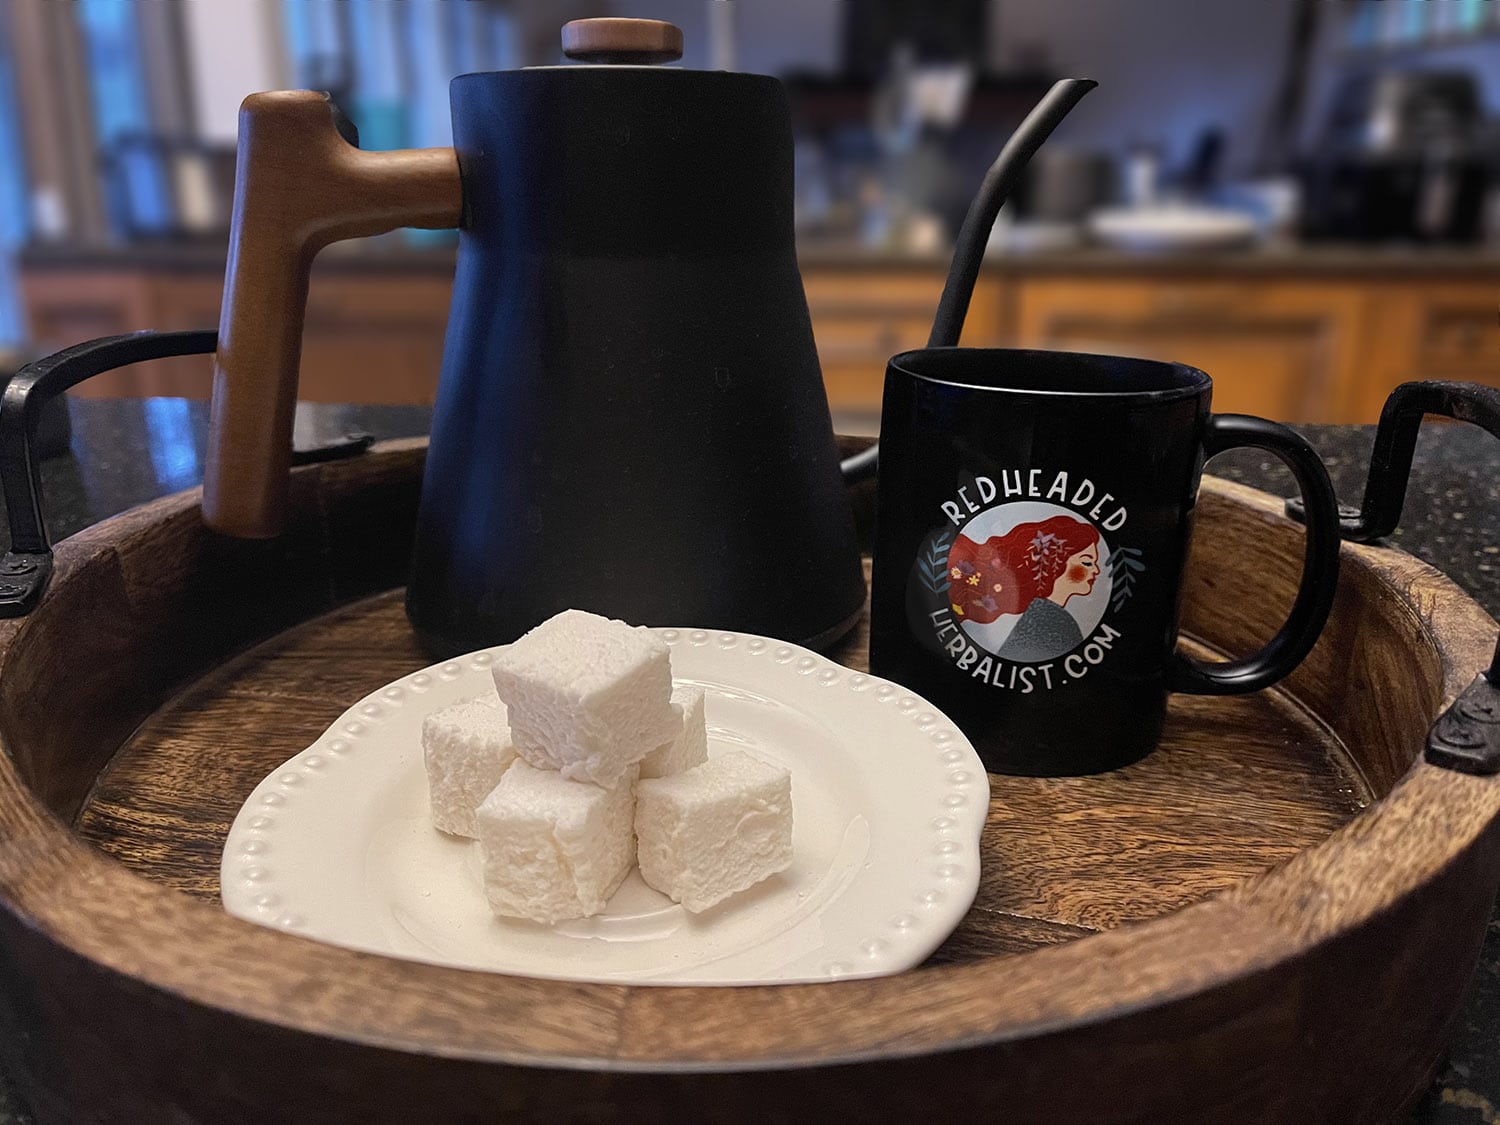
*Real* Marshmallow Root Marshmallows
Ingredients
Scale
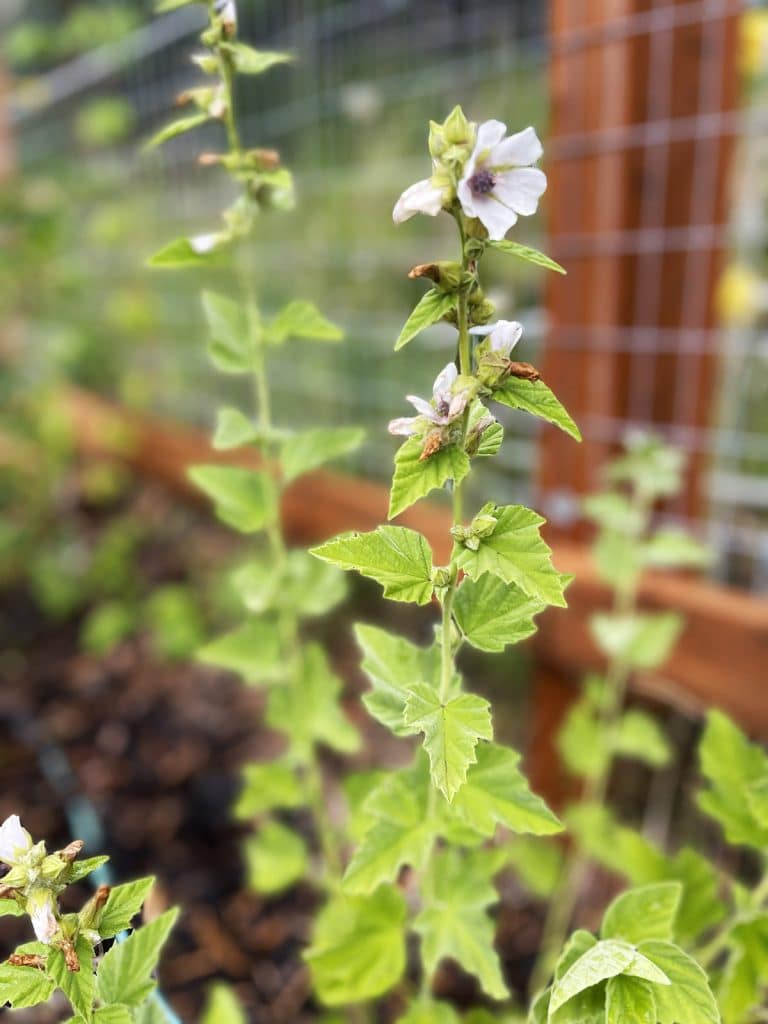
1 1/2 c cold infusion of marshmallow root (instructions above)
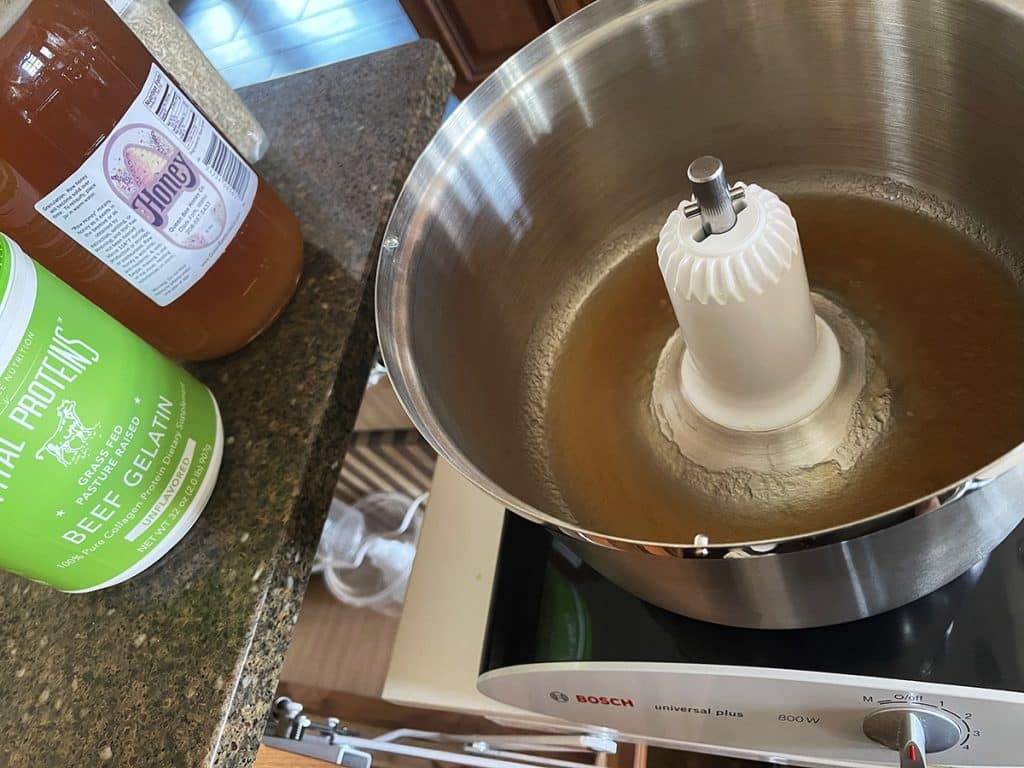
3 T powdered gelatin
1 c local honey
1 T vanilla extract
pinch high-mineral salt
coconut oil (for oiling your pan and spatula)
3–4 T arrowroot powder (for dusting)
Instructions
- Cut a piece of parchment paper (or a silicone baking mat) to fit the bottom of a 9″x13” baking dish. Rub the bottom of the pan with a bit of coconut oil to help the parchment stick in place, then lightly grease the parchment with coconut oil.
- In a large mixing bowl (or the bowl of stand mixer), combine 1 cup of marshmallow root infusion and powdered gelatin, stirring until the powder is fully moistened. Add vanilla and a pinch of salt and set aside to allow the gelatin time to bloom.
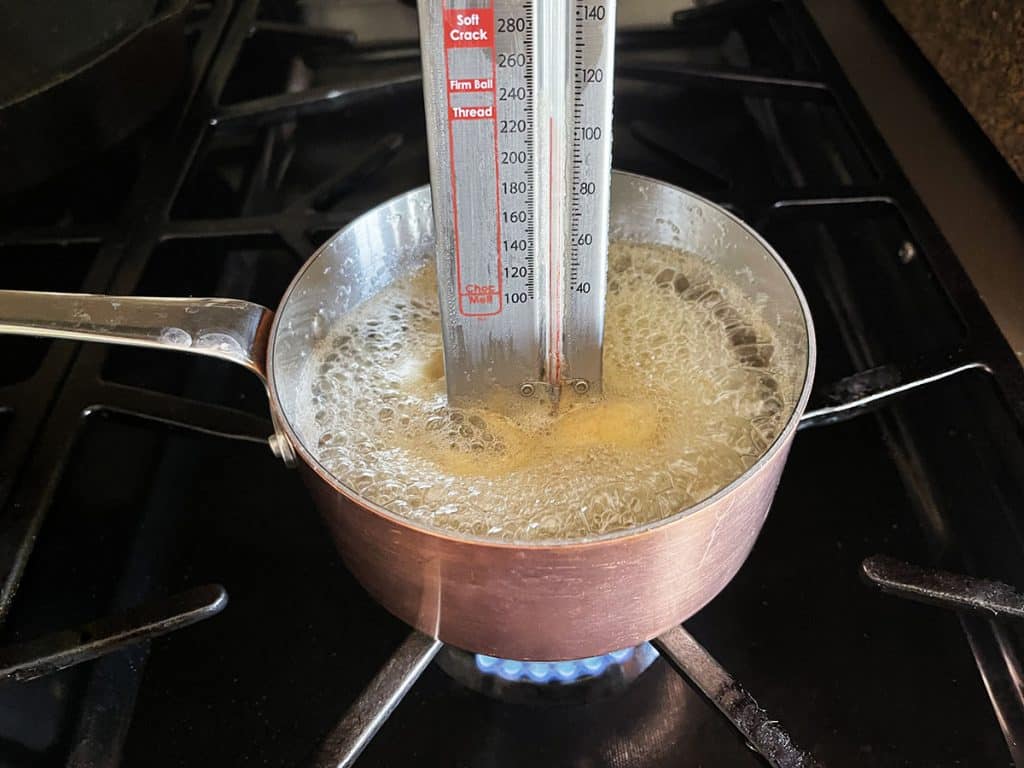
- In a small saucepan, combine 1/2 cup marshmallow root infusion with 1 cup honey and bring to a boil over medium-high heat; continue simmering until the honey mixture reaches 235-240F.
- Pour the hot honey mixture into the mixing bowl with the bloomed gelatin.
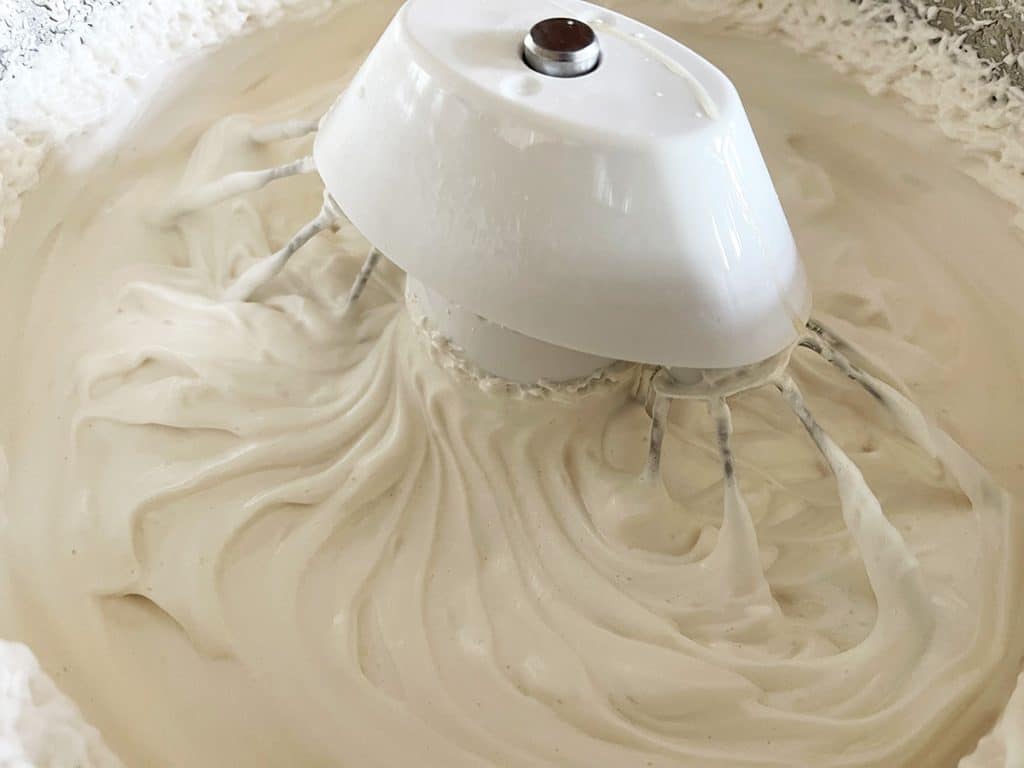
- Using an electric hand/stand mixer at medium-high speed, whip until the mixture stiffens and doubles in size. This may take 10-15 minutes. You’re looking for ribbons but not super stiff or you’ll have trouble smoothing it out in the pan.
- Using an oiled spatula, spoon the marshmallow mixture into the prepared pan., smoothing out the surface as you go.
- Let the pan of marshmallow set and dry at room temperature for 4-6 hours (or overnight). You can leave the pan uncovered or loosely cover with something that won’t contact (and stick to) the marshmallows. You want some air flow to help them dry.
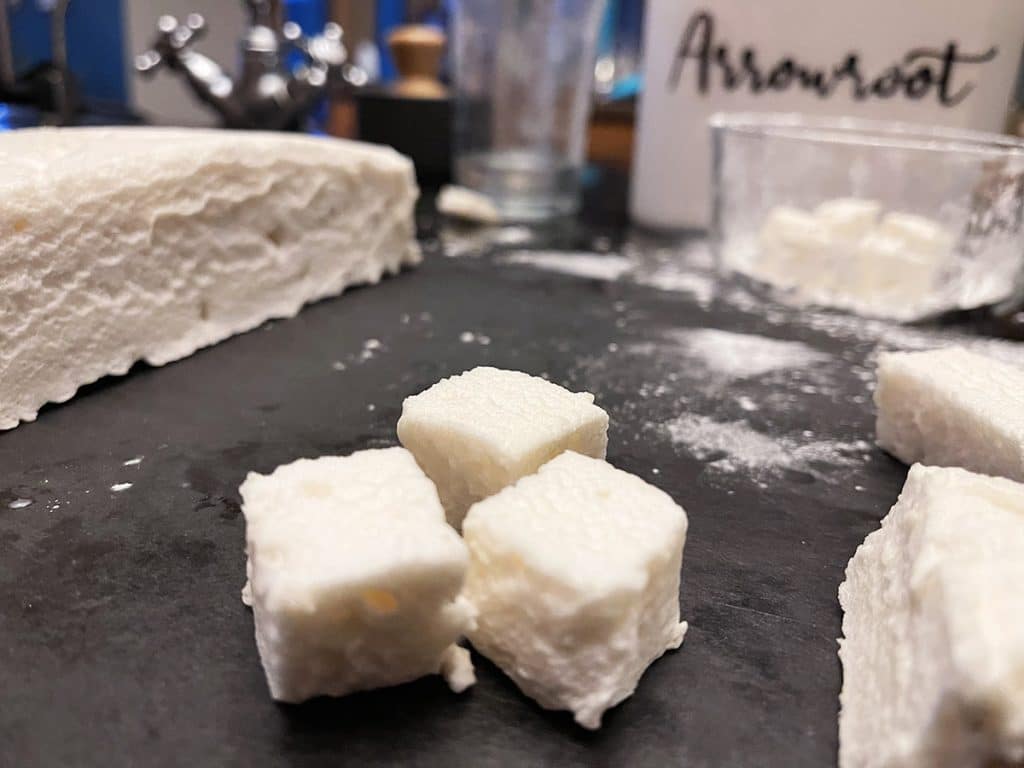
- Prepare a small bowl filled with a few tablespoons of arrowroot powder.
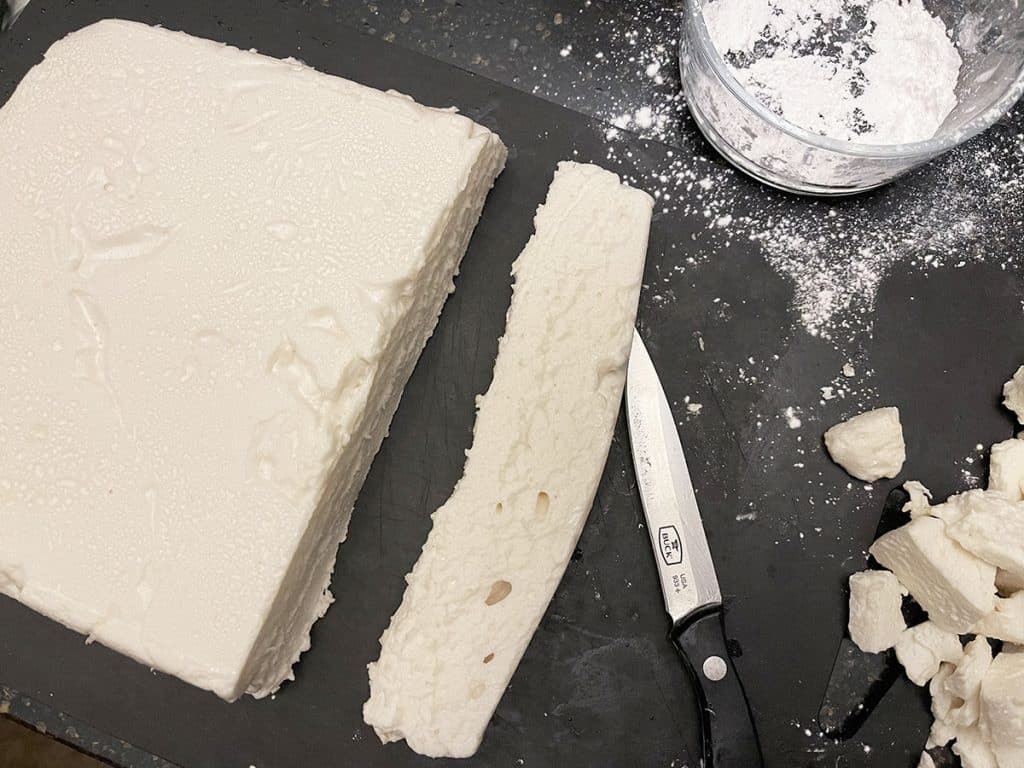
- Lightly grease a sharp knife with coconut oil and cut marshmallows into squares. Use a paper towel saturated with a bit of coconut oil to wipe down your blade in between cuts.
- Toss marshmallow squares/shapes in arrowroot powder, tapping off any excess powder.
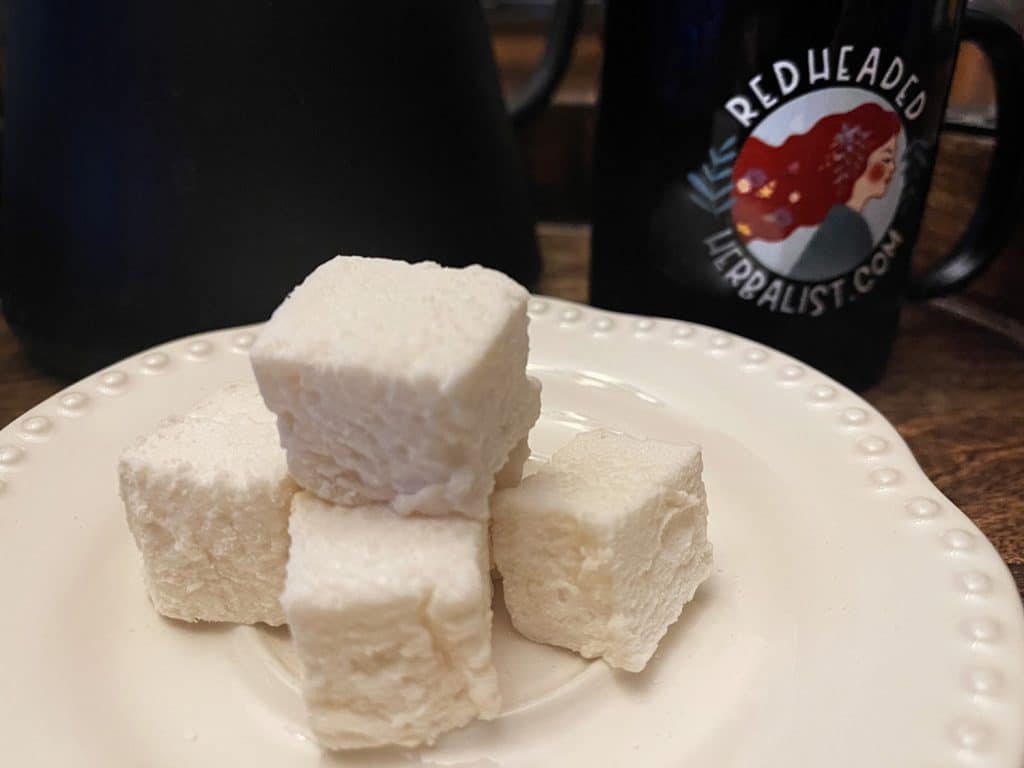
- Transfer to an airtight container for storage. Thanks to their high honey content, they should keep at room temperature for a week or two, in the refrigerator for up to 3 weeks or in the freezer for up to 3 months. (YMMV depending on your climate and humidity levels.)
Notes
Avoid adding oily additives to the fluff during the mixing process. Marshmallows rely on gelatin forming a delicate protein network that traps air and water. Oil disrupts that network and interferes with the way the proteins bond to each other. Even a small amount of oil (whether from oil-based food dye, oily extracts or greasy utensils) can cause the foam to destabilize and collapse, leading to a runny consistency.

106 Responses
Can you use date syrup or maple syrup instead of honey will it turn out the same? Appreciate your recipe!
Hi Brody, I’ve made this recipe with maple syrup and cinnamon before, and it was wonderful! Maple-cinnamon flavored marshmallows are 😋. I haven’t tried date syrup yet, but I imagine it could work too. The taste won’t be exactly the same, since date syrup tends to have a distinctly fruity flavor, but I’m betting it would be pretty great in its own right… Please let us know if you try it!
Thanks for the recipe! A friend just sent this to me, and I’m looking forward to trying it out! I love cooking and baking as it is, so I’m sure this will be fun! 😊
I just made them with honey, maple syrup and dare syrup mixed all together. They’re drying now but I tasted the mixture and it was divine
I love it! Thanks so much for the feedback, Janna!
I’m so glad I found your recipe! I’ve barely finished making them and it’s going to be a long day waiting for them to set. Everyone has had a taste and it is so good! I’m already excited to experiment with additional flavors next time I make them. It’s been on my mind for a year to make marshmallow with the root and it’s felt very intimidating to try….it really wasn’t that bad. Definitely using this recipe over and over again!
That’s awesome, Seanna! Thank you for sharing your experience, and I can’t wait to hear about the flavor combinations you make! ♥
Thank yoooou for sharing this recipe! Could you tell me how long they keep? And is freezing out refrigerating ever recommended?
Hi Lindsay! You’re so welcome! They should keep at room temp in an airtight container for a week or two, since the high honey content acts as a natural preservative. If you need to keep them around longer, then you can refrigerate for ~3 weeks or freeze for up to 3 months.
I would love to make these using a silicone mold!! Have you tried piping the marshmallow mixture into molds? Would that work?
Hi Hannah, I have not tried this recipe with silicone molds, but I imagine that could work – especially if you under-fluff the marshmallow mixture a bit (i.e. less time in the mixer) so it’s not quite so thick when you pour into the molds. If you try it, please let us know how it goes! ♥
If I don’t have time to wait 6-8hours can I make a tea from hot water and cool it to make the marshmallows? Will that make it any faster?
No, the mucilage will not form in hot water. It has to be slow infused in cold water.
This did not work. I followed to a T and I just wound up with a brown ball of goo after mixing???
I’m sorry to hear that, Linds. Unfortunately, there are many things that can go wrong with candy making… Did your gelatin bloom? Were any of your ingredients old/expired? Did your honey reach the soft ball stage? So many variables, and, unfortunately, it’s hard to guess from afar. I hope you give it another try!
Can I use these marshmallows to make rice krispy treats? I’m thinking just mix in the melted butter and rice krispies as soon as it comes off the mixer – would that work?
Yes, you can absolutely use your homemade marshmallows to make rice krispies! And your idea is exactly right… you’ll want to mix the puffed rice and melted butter directly into the freshly whipped marshmallow while it’s still soft and fluffy, before it starts to set.
Do these marshmallows smore?
I ran into the same issue as Linds. Approximately how long should I let the gelatin mixture bloom?
Okay, I didn’t want to lose hope on these so I just kept at them with the mixer and that made them turn away from the brown goop into that fluffier consistency.
Linda, if you’re seeing this. Just keep mixing longer 🤷♀️
Bless you because I thought I made a mistake also and I kept whipping it because of your comment. It got way lighter and fluffier! Hoping I’ll have marshmallows in a few hours! The fluff tasted promising!
Yay, so happy it finally fluffed! Thank you for sharing your experience, Amanda ♥
It took a while but eventually the mixture fluffed up and got lighter. My kitchen aid mixed was on for around 25 mins. I also used unflavored beef gelatin it was a gooey glob once it bloomed but mixed in fine!
Look forward to trying! I don’t have access to fresh marshmallow root; are dried preparations okay as a starting material? Many Thanks! 🙂
Hi Ron, Absolutely – I’ve used dried marshmallow root many times and it works great!
How much dried herb would I use? Thank you
I use approx. 1/3 of an ounce (weighed) of cut marshmallow root (roughly 3 rounded tablespoons) in about 2 cups of cool water
I was so excited to find this recipe and can’t wait to try it. I was trying to find gelatin powder but the main kinds I was able to find unflavored beef gelatin powder and the gelatin sheets. Would I be ok to use that kind of powder and what stage would I add other flavorings?
Absolutely – beef gelatin is what I use in the recipe (this one, specifically I like: https://amzn.to/41geJN4 but any most brand should do the trick.) I haven’t personally used the gelatin sheets, but I would think those would also work well.
Perfect thank you. Is there particular stage that would be best to add in other flavorings
Do you mean like the vanilla extract (or almond or peppermint)? That would be added at step 2 in the recipe. I would probably wait to stir in powdered things (like cocoa powder) until the marshmallows start fluffing up in the mixer.
Can I used dried marshmallow root (not powdered) to make marshmallows
Hi Ruth, Yes, you can absolutely use the cut root – this is what I keep around the house. Powdered loses its potency more quickly so the larger pieces are better for storage.
Hi! Can you use Marshmallow leaf in replacement of the root to make the infusion?
Hi Kasey, Marshmallow leaf doesn’t contain as much mucilage as the root, though since the structure of the homemade marshmallow relies primarily on the combo of heated honey and gelatin, marshmallow leaf should still work.
Hi,
Thanks so much for sharing your knowledge of herbs!
Now I\’m in the middle of making this and am wondering about the amount of water for the cold infusion. Does \”1-1/2 cup\” mean one and a half cups? This means ca. 350 ml water to 9 grams of marshmallow root?
Thanks!
Hi Anu, Exactly right! 1 and 1/2 cup, so approx. 350 mL to 9 grams of marshmallow.
Does the T mean table spoon or tea spoon
Capital T means tablespoon, lowercase tsp means teaspoon.
Can you substitute the gelatin for agar agar? And can you use marshmallow root powder, if so how much?
You would use the same amount of marshmallow powder as you would the cut/sifted marshmallow root – 1/3 ounce (by weight). I’ve never tried making marshmallows with agar agar. I bet it can be done, though!
Yes you can it’s approx a heaped tablespoon
Good to know! Thanks for sharing! ♥
These turned out wonderful and my (picky!) kids love them! We used powdered sugar instead of arrow root to dust them. Going to try to roast them tonight and going to try to remake them with simple syrups made with some of the fruits on our farm (in lieu of honey) in the future.
Oooh, I like that sound of that experiment! Thank you for sharing your experience and please let us know how the fruit syrups work out! 😋
Powdered sugar (has cornstarch and sugar) was a disaster for coating. Humidity in kitchen is 56% and as I coated them and tossed them in a bag and moved them to another finished bag . They got SUPER STICKY and wet but didn’t notice until I was done. I had to take them back out and separate them after coating and currently drying them out again… Maybe wasted them all 🙁 next time I’m doing arrowroot. They already dried a full day at room temp before coating and cutting.
Hello, In all my ages I have wanted to try a real marshmallow.. made from the plants.. and I’m wondering if you know of anyone who sells them. Be ever so grateful… Thank you. It’s part of my bucket list…
Hi Sherrie, There doesn’t seem to be a ton people out there selling homemade marshmallows made with marshmallow root, but I did find this gal on Etsy. Her marshmallows use sugar rather than honey. I have not tried them myself, but they look pretty good!
https://www.etsy.com/listing/1892567331/marshmallows-made-with-real-marshmallow
I would like to use this recipe to make marshmallow fluff. Do you have any recommendations on how to keep it in a fluff state?
I haven’t tried this, but you can try stopping the whipping process a little earlier than you would for marshmallows — just as soft peaks begin to form. This should keep it looser and more like a fluff or spread rather than setting up into a bouncy marshmallow. You might also try adding a little bit of arrowroot or tapioca starch (about 1 tsp) to the whip to help stabilize and slightly thicken the fluff without firming it too much. A small amount of cream of tartar (like 1/8 to 1/4 tsp) can also help stabilize the fluff and prevent crystallization of the honey.
Do you cover the marshmallows as they are setting or leave open?
Hi Loren, I’ve done it both ways. Leaving it open is fine, but if you have a way to loosely cover the pan with something that won’t contact and stick to your marshmallows (while still allowing some air flow) that would be ideal. You just don’t want an air-tight cover.
Hi! Can I use cane sugar instead of honey? Thanks!
Hi Brittany, I don’t see why not, though I haven’t tried this myself. You’d probably want to increase the amount of sugar slightly since honey’s about 25-30% sweeter. Maybe try subbing 1-1/4 cup granulated sugar + 1/4 cup water + a splash of lemon juice (to compensate for honey’s natural acidity).
Thanks for getting back to me so quickly! I went ahead and made them before seeing your reply- using a 1:1 ratio sub with cane sugar and they turned out fantastic! I’ve made these once before (different recipe and not a cold infusion of marshmallow root and didn’t love them..) The only honey I had on hand is very floral so I was nervous they’d be overpowering in flavor like last time – this recipe is great. Thank you so much for sharing and I love knowing I can make a cold infusion mallow root just for medicinal purposes as well!!
I love it! So happy to hear your batch turned out so well! Marshmallow root rocks!
Can I use Agar Agar in place of gelatin?
I’ve never tried making marshmallows with agar agar. I bet it can be done, though… If you try it, please let us know how it goes!
Thank you for your awesome recipe. Marshmallows were perfect in appearance but tasted awful like overcooked bitter honey. I used a laser thermometer and wonder if the bubbling of the honey distorts the reading as the temperature also did not go up ( but the honey certainly did, boiled it to bits) I ve been making marshmallows with suger fine. So am familiar with the process. Just can not get the honey taste right. ( using nz Manuka honey)
What are your thoughts
It’s hard to say for sure from a distance, but if your honey tasted fine pre-heating, it may have been overheated. Manuka honey has kinda a strong, almost medicinal flavor to begin with, and it can turn bitter or acrid when heated too aggressively (unlike sugar, which is quite forgiving). Laser thermometers only read surface temperature — so it’s possible your reading may be inaccurate, especially in something as dense and viscous as honey, which could easily be 20–30F hotter at the bottom of the pan.
Thank you so much! I have been saving this recipe (and some dried marshmallow root) for Easter, but I went ahead and made a cold infusion a few weeks ago just to try it out. It helped my daughter and myself with our allergies, and my husband with his heartburn! What a cool magical plant! Definitely making marshmallow root a pantry staple, and I’m excited to make these treats for Easter. 🙂
ummmm is it possible to over-mix it? If so…i think i just did RIP
Over mix in that is becomes runny not fluffy
ok wait would oil based food coloring deflate it, i think thats what messed it up
It is possible to over-mix, but typically, the fluff will become overly stiff — not runny. I think you’re right to suspect the oil-based food coloring. Marshmallows rely on gelatin forming a delicate protein network that traps air and water. Oil disrupts that network and interferes with the way the proteins bond to each other. Even a small amount of oil (whether from oil-based food dye, oily extracts, or greasy utensils) can cause the foam to destabilize and collapse, leading to a runny consistency.
Try tossing the fresh marshmallow in toasted coconut instead of the arrowroot powder. They are delicious. At Easter, I also froze my marshmallows and then dipped them in dark chocolate with crushed peanuts. They were a hit!
Fabulous suggestions! I like the way you think! 😍
If you live at a really high altitude you might need to adjust the temp you heat the mixture to. At 6k feet I only heated to 224* and that was perfect. I had a ton of issues before that trying to figure the recipe out (I would never get a while fluffy mixture before that, only a brown lumpy thing haha)
Important observation, Jordan! Thank you for sharing!
I made theses marshmallows with marshmallow root and I absolutely love them! Thank you for sharing g this recipe. My husband doesn’t like store bought marshmallows, but loves these! ❤️
Yay! So happy you and your husband are enjoying them! There’s such a difference between marshmallows made from *real* food vs the ones from the store, isn’t there?
I tried making this recipe, but it didn’t work :/ I wasn’t sure to what temperature I should let the honey cool? Also I didn’t have a standing mixer, so maybe that is an important part.
Hi Kelsey, Thanks so much for giving the recipe a try — I’m sorry it didn’t work out this time!
Once the honey reaches the soft ball stage (around 235–240F), it should be poured immediately into the bloomed gelatin while still hot. There’s no need to let it cool first — in fact, letting it cool too much can prevent it from whipping properly.
As for the mixer — yes, a stand mixer is highly recommended for this recipe. The honey-gelatin mixture needs to be whipped at medium-high speed for about 10–15 minutes. A handheld mixer can work if it’s a strong one, but it’s a bit of a workout! Don’t give up — it can take a try or two to get the hang of it, but it’s worth it. 😊
I don’t know if my comment published earlier but I was wondering if heating honey or maple syrup that high will just kills the enzymes and benefits in the end? The only trouble I have with marshmallows as I tried making them on lower heat but it doesn’t quite work
You’re absolutely right — heating honey or maple syrup to candy temperatures will destroy the natural enzymes, probiotics and some of the antioxidants that make raw honey and pure maple syrup so special from a nutritional standpoint. These compounds are very heat-sensitive and start breaking down well before reaching the soft-ball stage. So while honey and maple still offer better-for-you sweetness compared to refined sugar (especially in terms of flavor, trace minerals and being less processed), their medicinal qualities don’t really survive high heat. At that point, it’s more about choosing natural sweeteners for their flavor and the kind of ingredients you want to support.
Like you mentioned, trying to make marshmallows at lower temperatures just doesn’t quite work. That candy stage is key for developing the structure and texture — otherwise, the gelatin won’t whip up properly, and you’ll end up with something too runny or flat.
is there a point in the process where I can add in honey drizzle at room temp for a flavor and health benefits, where it won\\\’t cook but still get into the marshmallow? I\\\’d use sugar for the step that would use honey then add in honey for health benefits and cough benefits, I think it would have to be no hotter than 95F or honey starts losing its benefits 🙁
I’ve infused my marshmallow root and I’m hoping to try tomorrow. Also have you tried a version with egg or egg whites before. If so did you find a difference in texture and taste? Thank you for the recipe 🙂
Hi Ari, I haven’t personally made marshmallows with egg whites before, but I know there are lots of recipes out there that use them. From what I understand, adding whipped egg whites can give the marshmallows a lighter, fluffier texture – almost like a cross between marshmallow and meringue. The version I make (with gelatin and honey) is a bit denser and chewier. If you end up trying an egg white version, I’d love to hear how it turns out!
I’m hopeful but bummed. I let my marshmallow root extract sit overnight in the water and then trying to strain it through cheesecloth and a sieve or one or the other I ended up only getting 1 cup from the 1.5 cups so now I have 2 more tbps in 3/4cup for another 8 hours. I originally started with 3 tbps for 1.5 cups.
Not sure what I did wrong but that baby diaper wasn’t getting anything else out unless it wasn’t just the infused water. (Contaminated with some of the root extract).
Another night I guess will be safe for the first batch I’m sure, it’s back in the fridge.
Hi Hedgehodge, Marshmallow root is extremely mucilaginous when it hydrates, which is great medicinally but makes straining a real challenge! As you discovered, it clogs cheesecloth or fine mesh easily (“baby diaper” – ha! 😂) – particularly if you’re using root powder instead of the cut and sifted larger chunks. You didn’t do anything wrong, and honestly, I wouldn’t bother doing another overnight infusion. You already have a nice thick infusion – just top up what you have with a little water and proceed with the recipes as usual. Good luck!
Regarding adding honey after the heating stage, you can do it, but it’s tricky in marshmallows due to their sensitive structure. Here’s what I would try: When your marshmallow fluff is just about done whipping, gently fold or swirl in your raw honey just before pouring it into the pan. Maybe use about 1–2 tablespoons per batch, so it doesn’t interfere too much with setting. Adding too much honey directly to the mix can soften or destabilize the marshmallow structure, so you’ll need to find a balance: just enough for the benefit, but not enough to ruin the texture.
Thank you x2 🙂 I’ll give it a shot maybe my first go or wait until my 2nd .
I got mine to 232F and stopped because when I stirred it the temp went down . I used a 2qt sauce pot and it was pretty shallow. I ended up whipping for almost 40mins to save the local honey cost LOL. I turned it to max blspeed on mixer for like 3 minutes. Trying to get those peaks when it\’s off wasnt happening. Then when I went to pour I got them poured in and realized they were setting to jello like consistency pretty fast . Whatever, the. Kids liked the stuff even if I use it as fluff or for hot cocoa, it\’s sitting out at room temp now until tomorrow. Thank you ! I saw another recipe put it in the fridge afterwards… Will that speed up eating these ?
Next time I\’ll get temp to 240. I\’m at sea level. I also used vanilla paste
Could you pipe these into shapes?
If you work quickly enough, you sure could!
Success! Best marshmallows I ate so far, made using fresh root and honey. I followed the advice is to keep them at room temperature in an airtight container. Sadly, they got mouldy very quickly and had to bin them.
Aw, I’m sorry to hear they spoiled too quickly. Are you in a humid climate by any chance? I guess we’re pretty dry here, so things keep a bit longer.
I love this recipe. Thank you! This is my second time making and I doubled the batch – but painstakingly found out it takes twice as long to mix it! So here’s an encouragement to anyone who tried doubling the recipe and is reading through the comments like I did – KEEP MIXING! It takes almost 40 minutes to mix the doubled batch! Whew. So yummy though
Thanks so much for the feedback, Abby! Very helpful to know how long it might take to get a doubled batch to reach the fluff stage ♥
Oh boy! I miss placed this recipe but I had ordered marshmallow root to make these a while ago. So me being me I used a keto/sugarfree recipe and just added a 1 tsp marshmallow root when mixing . I hope that’s not the most awful thing I could do but I’ll wait to see. They whipped fine and the mixture tastes pretty good although a smidge dark . Next time I follow this recipe 🤞🤞
I’ve made this three times from dried marshmallow root. First with honey, then a half batch with allulose/Monkfruit, and then a third half batch with allulose/Monkfruit and ½ tsp almond extract and 1.5 tablespoons with cocoa powder.
I squeezed about a tsp of lemon juice into the allulose/Monkfruit while making the syrup and it went pretty quickly. The overnight infusion never got gooey, but they still floofed fine.
My problem is that these don’t do well over a fire. They melt very quickly, and I was wondering if you had any suggestions to help them keep shape while over a flame?
Great experiments — you’ve been busy! 💪 These homemade marshmallows are definitely softer and more delicate than store-bought. I haven’t tried toasting my marshmallows over a fire before, but I wonder if whipping in an egg white (or a couple of tablespoons of aquafaba) during the last 1–2 minutes of mixing might help add some structure and heat resistance. If you try it, we’d love to hear how it goes!
My daughter doesn’t like the taste of honey so I decided to do half maple syrup and half apple cider syrup that I had just made a few days ago. These marshmallows taste like apple pie. I bet they would be delicious on sweet potato pie. I might do this again right before Thanksgiving to try it out!
Yum! That sounds incredible, Hope, thank you for sharing! ♥
Thank you! Can’t wait to try this 🙂
These came out so well so far!! They haven’t set yet but they taste amazing so far and was relatively easy to make. Planning on using them in bone broth hot chocolate while my husband is sick
Thank you for sharing your experience, McKenna! Using them in bone broth hot chocolate is brilliant! I hope your husband feels better soon ♥
Hello! Do you think using monk fruit powder instead of honey or sugar would work?
Great question! Pure monk fruit powder on its own doesn’t work well for marshmallows — it’s too concentrated and doesn’t provide the bulk or structure needed to whip and set. For a sugar-free version, you might try monk fruit combined with a bulking sweetener like allulose. Allulose behaves like sugar when heated and should whip up beautifully.
Hi there! I just tried making these but I’m afraid maybe I’m using the wrong kind of marshmallow root. Mine is darker brown in color and has the smell and taste of herbs (like maybe it’s the kind you would put in capsules to take or something). Is there a specific kind you can recommend to get for making marshmallows? Thanks so much.
Hi Jane, For making marshmallows, it’s generally easier to work with dried marshmallow root that’s cut and sifted (sometimes labeled C/S on the package), rather than powdered root. If your root is dark brown, finely ground or strongly “herbal” smelling, it’s probably powdered marshmallow root intended for capsules or tinctures. That kind can still work medicinally, but it tends to make the marshmallow mixture muddy looking and harder to strain. My favorite source is Mountain Rose Herbs: https://mountainroseherbs.com/marshmallow-root
Another possibility is that the powdered marshmallow root may simply be old. Fresh marshmallow root (whether cut or powdered) is typically beige to a light tan in color with a mild, slightly sweet earthy smell. As it ages and oxidizes, it can become darker and stronger smelling, especially in powdered form.
I am a huge fan of this recipe so far I\’ve tried it 3 times and it has turned out perfect every time. I am making a post about it, and will be pointing people to your page!
Yay, so happy to hear it! Thank you, Aurora! ♥
I followed the recipe and added a little cinnamon, they turned out perfect!!
Cinnamon marshmallows are the cat’s pajamas! Thank you for sharing! ♥
How do you fix it if it didnt fluff up. I dont want to waste it but it just stayed liquid.