
As our days get busier, we are far more likely to reach for pre-packaged mixes and other convenience foods to lighten our load and make dinner prep a bit easier. These are some of my favorite homemade Kitchen Heroes you can make in advance and keep handy for those extra-hectic evenings… or even the non-hectic ones. Work smarter, not harder!
In the world of handy homemade kitchen companions, Greek yogurt is a real stand out. In my home, we’re never without this indispensable multitasker. You may have noticed that it’s featured in many of my favorite recipes. No exaggeration, I use it every day in one way or another. Greek yogurt’s lovely thick consistency makes it a versatile workhorse in both sweet and savory dishes — and everything in between.
Why make your own yogurt?
Most of us know that yogurt can be a great source of probiotics. The live cultures and enzymes contribute to a healthy gut, aiding digestion and promoting overall well-being.
While high-quality commercial yogurt is generally a wholesome, minimally processed food choice, it often contains thickeners, stabilizers, preservatives and sweeteners. Making your own ensures a purer product with no mysterious additives; just the ingredients you want.
Homemade yogurt also gives you full control over the fermentation time. Commercial yogurt is typically fermented for only about 4 to 6 hours. Manufacturers opt for shorter fermentation times in order to achieve a milder flavor that appeals to a wider customer base. The shorter fermentation period allows for less acidity to develop in the yogurt, resulting in a smoother, less tangy product for consumers accustomed to milder yogurt varieties.
When you make it yourself, you’re free to customize your homemade yogurt to suit your tastes, dietary preferences and health goals.
Making yogurt at home is also a budget-friendly alternative to store-bought. (I mean, have you seen the price of good-quality yogurt lately?) Making yogurt in bulk at home requires little more than milk and a starter. You can regenerate your starter with each batch, so you only have to source a starter culture the first time you make yogurt. And depending on your milk source, it can be far more cost-effective than purchasing an equal amount of the commercial brand yogurt.
(hint: it’s usually much cheaper to buy directly from a farmer vs the health food store.)
Another reason is flavor. We re-committed to making homemade yogurt consistently about a year and a half ago, and it’s kinda ruined us for store-bought. A couple times I got busier than usual, and had to source store-bought yogurt for the sake of convenience. Even though I did my best to find the best quality (read: expensive) organic, grass fed, additive free etc. etc. yogurt option available, Mr. Redheaded Herbalist complained that the flavor was lackluster compared to what we’re accustomed to. He wasn’t wrong.
What can I say? We’re spoiled.
A true kitchen hero
Greek yogurt is a particular style of yogurt that’s been strained to remove most of its whey (the liquid portion of yogurt), resulting in a thicker, creamier consistency compared to regular yogurt. Because Greek yogurt is more concentrated than regular yogurt, it typically contains a higher amount of protein per serving.
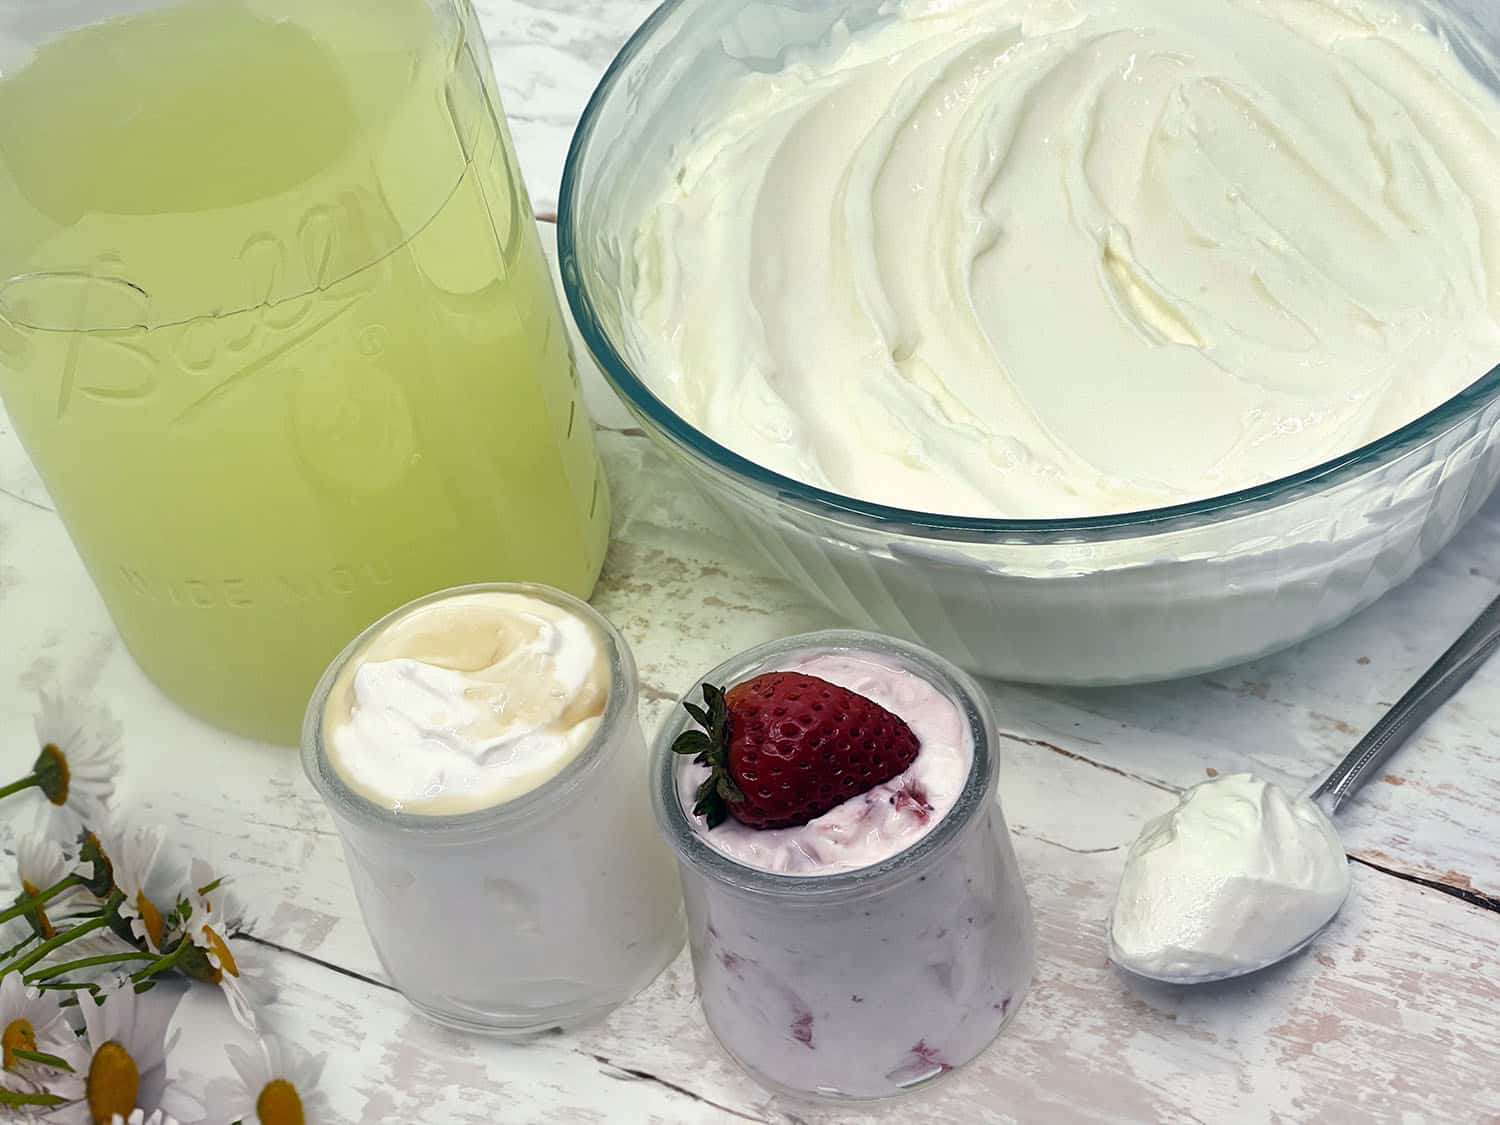
Greek yogurt mixed with fruit is a no-brainer addition to a breakfast spread. We have a little along with our eggs every morning. Try making a yogurt parfait mixed with berries, nuts, shredded coconut and even a bit of whipped cream for a fancier presentation and more dessert-y feel.
If you’re more of a breakfast smoothie person, Greek yogurt adds a creamy texture and a boost of protein and pairs well with a variety of fruits and vegetables. Experiment with flavors and textures by adding your favorite herbs, chopped nuts and seeds, or even a swirl of honey or maple syrup.
And by the way, a bit o’ honey — particularly clover honey — might even improve the probiotic benefits of your yogurt by helping the bacteria to survive the digestive process! Sweet!
I use yogurt as a base for all kinds of creamy dips, sauces, marinades and dressings. Yogurt is an excellent carrier for various spices, herbs and aromatics. Try replacing the mayonnaise portion of your favorite deviled eggs recipe. Yogurt can be used as a healthier substitute for sour cream or oil in many baking recipes. Since I discovered that we can’t tell the difference between my homemade Greek yogurt and sour cream on tacos or in recipes, I never bother with purchasing sour cream anymore.
Yogurt-based marinades are a popular technique in many cuisines, especially in Middle Eastern, Indian and Mediterranean cooking. The lactic acid helps break down meat’s proteins, resulting in tender and flavorful dishes. The creamy texture of yogurt helps seal in moisture, preventing the meat from drying out during cooking, particularly for lean cuts.
Or make some labneh. Labneh is a delicious Middle Eastern strained yogurt cheese made with strained yogurt, salt and herbs. Use about 1/4 tsp salt per cup of strained yogurt. Top with a drizzle of olive oil, red pepper flakes or Za’atar spices and mint leaves. Use as a spread for bread or crackers, a dip for vegetables or a creamy topping for Middle Eastern-style dishes.
Or mix it with shredded cucumber, lemon juice, garlic-infused olive oil, tons of dill and a little salt and pepper to make a delicious and versatile tzatziki sauce. (Use it as a condiment or a side dish on its own!)
Or strain the yogurt a bit longer and make a yogurt cheese log. The longer you strain, the thicker the yogurt will become (use a weight to remove as much of the whey as possible) until the yogurt has a thick, creamy consistency resembling soft cheese. Jazz up the cheese with fresh herbs, spices and a pinch of salt and roll it tightly into a log shape using parchment paper. Refrigerate for a few hours to let it firm up before serving.
Or just use it as is.
We strive to eat a small amount of fermented *something* at every meal to aid digestion and maintain a healthy gut microbiome. A dollop of Greek yogurt is a simple way to do that, and makes a tangy condiment for all sorts of savory dishes, meats and veggies.
Equipment & supplies
To make Greek yogurt at home, you’ll need a few key pieces of equipment and supplies. While the process is relatively simple, having the right tools on hand will ensure consistent results.
Unless you’re using an Instant Pot or dedicated yogurt maker, you’ll need a heavy-bottomed pot or saucepan to heat the milk initially.
There are a variety of purpose-made yogurt makers available that are designed specifically for culturing yogurt. You don’t need to run out and buy one, though — you really just need a reliable way to hold your yogurt at around 100-110F for 8 to 24 hours (certain strains may need up to 36 hours) while the yogurt ferments.
A cabinet dehydrator like an Excalibur or my trusty Tribest Sedona Express works well, as does a warm oven with the light turned on. I haven’t tried the following methods myself, but I’ve also seen tutorials using a proofing box, a slow cooker/crockpot, a seedling propagation mat or even electricity free in a cooler, thermal slow cooker or thermal bag.
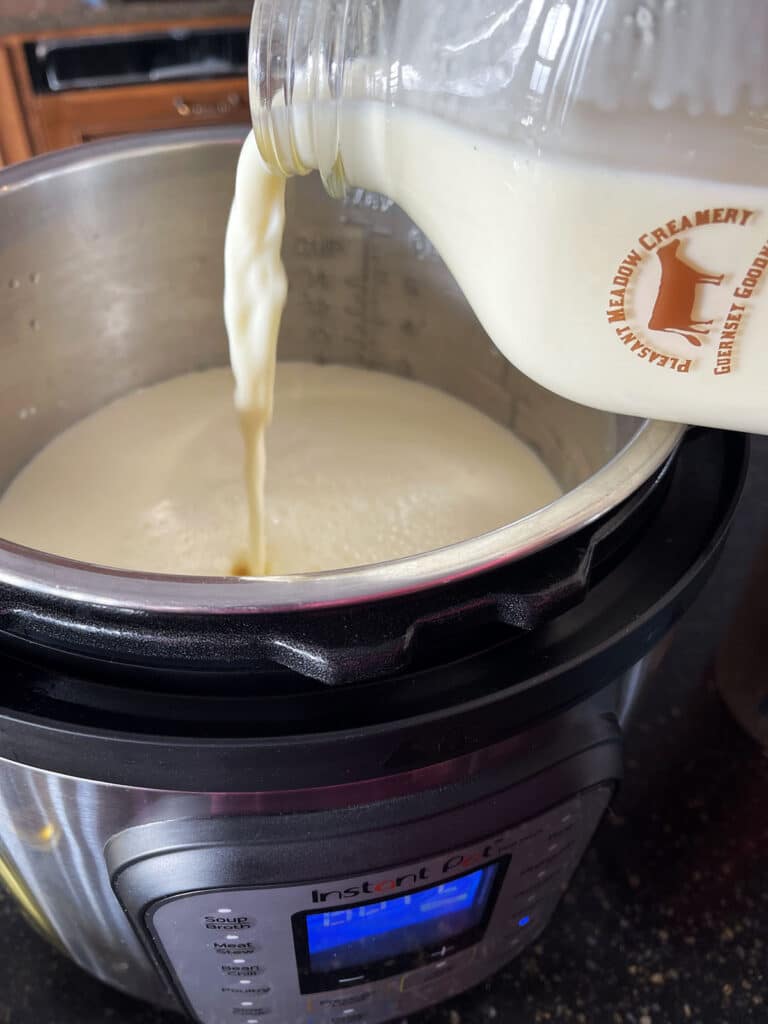
Personally, I’m an Instant Pot girl. I use my 8-quart Instant Pot on its yogurt setting for easy and convenient handling of the heating and incubating stages. I make a lot at once, so it’s nice to be able to make the whole gallon in the stainless IP liner, instead of dividing it up between jars.
You’ll need a whisk for stirring the milk and incorporating the yogurt starter. An accurate thermometer is also good to have in order to check on the temperature during the heating and culturing stages.
If using an oven or dehydrator cabinet, you’ll need containers or jars with tight-fitting lids to hold the yogurt during the fermentation process. Glass, plastic, or ceramic containers work well, and you can reuse them for subsequent batches.
Making homemade Greek yogurt consists of 4 basic steps:
- Heat the milk
- Cool the milk
- Add a starter culture & incubate
- Strain the yogurt
Step 1: Heating the milk (or not)
Typically, when making yogurt, the milk is first heated to around 180F in order to sterilize the milk and prepare a blank slate for the yogurt starter culture to take hold. You may have noticed in the photo above that we usually use raw milk to make yogurt.
There are lots of tutorials out there on how to make raw milk yogurt without this initial heating step and while there’s probably nothing at all wrong with that method, but you will end up with a very different flavor profile and a much thinner/runnier end product unless you add thickeners such as gelatin or pectin.
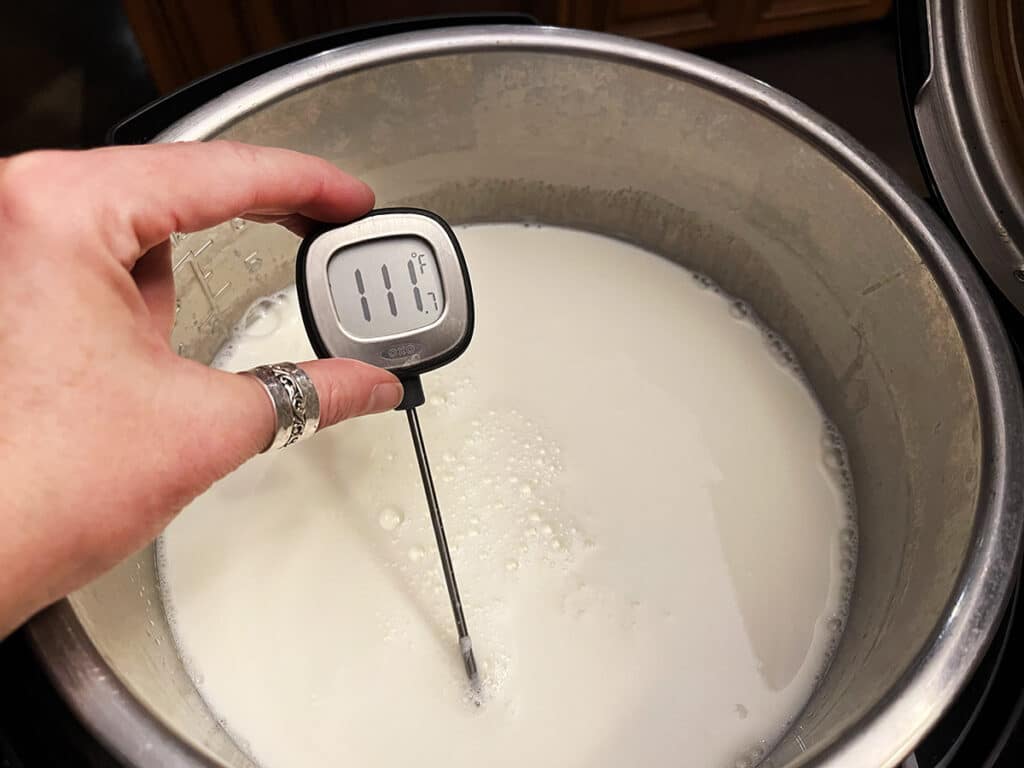
It may be an unpopular opinion in Traditional Foodie circles, but personally, I prefer to not skip the heating step. Raw milk is awesome for drinking raw milk, but it is my opinion that if you’re going to make proper yogurt, you really do need to scald the milk first, allowing the yogurt cultures space to do their thing.
Raw milk contains its own diverse population of bacteria, and they will compete with the bacteria strains in the yogurt culture during fermentation, resulting in a different flavor and a much thinner product — closer to clabbered milk in taste and consistency than true yogurt. To me, using raw milk and briefly heating it to around 160F seems like a good compromise.
If you’re using an Instant Pot, the boil setting is programed to take it up to 180, so if you’re shooting for less than that, you’ll have to keep an eye on it. Set a timer. In my 8-quart Instant Pot, it take about 25 minutes to reach 160.
But what if I can’t find raw milk, or it’s not legal in my state? Can I just use organic milk?
It depends. Counterintuitively, most brands of organic milk is Ultra high-temperature pasteurized. Ultra pasteurization, aka ultra-high temperature (UHT) involves heating the milk to much higher temperatures (280-302F), which can lead to substantial changes in the milk’s casein proteins. The casein’s structure unfolds and changes shape when exposed to temperatures above ~160F. This unfolding of the protein structure is known as denaturation, which can affect the texture and properties of the milk, potentially affecting their functionality and digestibility.
You really have to read those labels closely.
That said, as with most things, it’s not a black and white issue. Denaturing also contributes to the coagulation of yogurt, so minimizing the denatured proteins via a lower heating temperature will result in less firm yogurt (though not nearly as runny as raw milk yogurt that hasn’t been heated beyond 100-110F at all).
If you can’t find raw milk in your area, lightly pasteurized and non-homogenized is probably next best. In fact, I think homogenization may actually be a bigger issue than pasteurization.
Homogenization was introduced to the dairy industry in the early 20th century as a method to prevent cream separation in milk. The mechanical process uses high-pressure to break down the fat globules in milk into much smaller particles in order to create a more uniform suspension.
Homogenization is a necessary step in order to divide milk into the familiar categories we see at the grocery store: skim, 1%, 2% and “whole.” I put whole in quotation marks because it’s not technically whole — it’s 4% milk, while true whole milk straight from the cow (generally) can have a butterfat content up to 5%, depending on the breed of the cow.
Perhaps not surprisingly, homogenization was not met with universal acceptance when it was first introduced. Historically, the presence of a distinct layer of cream on top of milk was associated with freshness and quality, as it was seen as an indicator of higher fat content and richer flavor.
Consumers were skeptical of homogenized milk, viewing it as unnatural and less appealing than traditional milk with a cream layer. Interestingly, homogenized milk didn’t become widely accepted until the introduction of opaque paper milk cartons that effectively hid the newly processed milk. (Out of sight, out of mind!)
Folks may have been onto something when they viewed the new-fangled homogenized milk as unnatural. Homogenization can alter the way fats are digested and metabolized in the body. Some proponents of traditional diets argue that the smaller nano-sized fat particles produced by homogenization may be absorbed more rapidly in the digestive tract, potentially leading to metabolic imbalances and health issues.
Homogenization also exposes exponentially more surface area of fat globules to oxygen, which may accelerate the oxidation of fats, leading to the formation of free radicals, which can contribute to inflammation and oxidative stress in the body.
Maybe we should have trusted our grandparents and great grandparents’ intuition.
Raw milk from a trusted local dairy farm is always going to be your best bet, but Straus Family Creamery Organic Cream-Top Whole Milk and Kalona SuperNatural Organic Cream-Top Whole Milk are a couple of decent choices that don’t homogenize and use lower temp pasteurization.
Non-homogenized milk is easy to spot by the lovely yellowish cream layer floating on the top of the milk. ♥
Step 2: Cooling & inoculating the milk
Okay, stepping off the soapbox. Back to making yogurt…
Cool your scalded milk down to a bacteria-friendly temperature range — typically between 108F and 112F — before adding the starter culture. Mixing the starter yogurt or powdered starter directly into milk can result in lumps, so it’s a good practice to remove about a cup of the milk from the pot and thoroughly blend it with the culture in a small bowl before adding it back to the pot. Whisk well to ensure even distribution.
Greek yogurt is typically made using thermophilic bacteria cultures, which means they thrive at higher temperatures compared to other types of yogurt cultures. The main thermophilic bacteria strains used for making Greek yogurt are Streptococcus thermophilus and Lactobacillus bulgaricus, which have an optimal growth temperature range of around 108F to 112F.
You can get powdered yogurt starter culture from places like Cultures for Health, The Cheesemaker or Cutting Edge Cultures. You can also use a cup or any plain organic yogurt (look for a brand free of additives or preservatives) purchased from the store. After that, simply save a half pint of your finished yogurt to use as a starter for your next batch.
If purchasing powdered starter, be sure to look for “heirloom” cultures (as opposed to direct vat inoculate “direct set”) which can be perpetuated indefinitely and used for subsequent batches.
Step 3: Incubation
The mixture is incubated at the around 110F to allow fermentation and development of the yogurt. The duration of fermentation can impact various aspects of the yogurt, including its taste, texture, acidity level and probiotic content. Longer fermentation times generally result in a tangier flavor and thicker consistency, as well as higher levels of beneficial bacteria. You can make a decent probiotic yogurt in as little as 6-8 hours, but we choose to follow the GAPS recommendation to ferment it a full 24 hours to get the flavor we like and ensure maximum potency.
By fermenting the milk for a longer duration (e.g., up to 24 hours), it allows more time for the yogurt cultures to digest the milk’s lactose, break down the proteins and produce lactic acid, which also helps to thicken the yogurt. If you’re sensitive to lactose, you might do well with a longer-fermented yogurt.
Note: If you’re doing a 24-hour GAPS-style ferment, you’ll want to pull out your next starter around the 12-hour point so the yogurt has adequate lactose left to survive on while it waits in the refrigerator for the next yogurt-making day.
If you make yogurt often, you can store your starter yogurt in a mason jar in the refrigerator, or you can spoon the starter into an ice cube tray and freeze it for later. Once frozen, pop them out of the tray and store in a ziplock-style freezer baggie. To use, simply defrost a couple of cubes for every 1/2 gallon of yogurt you make.
Step 4: Chilling & straining
Once the yogurt has finished incubating, it’s time to let it chill for a spell.
Chilling the yogurt prior to straining can help minimize excess whey separation during the straining process. When yogurt is still warmish, its viscosity decreases and it tends to be more fluid, and whey can separate more easily from the yogurt solids. Chilling the yogurt first makes it easier to strain without losing valuable solids (aka your Greek yogurt!)
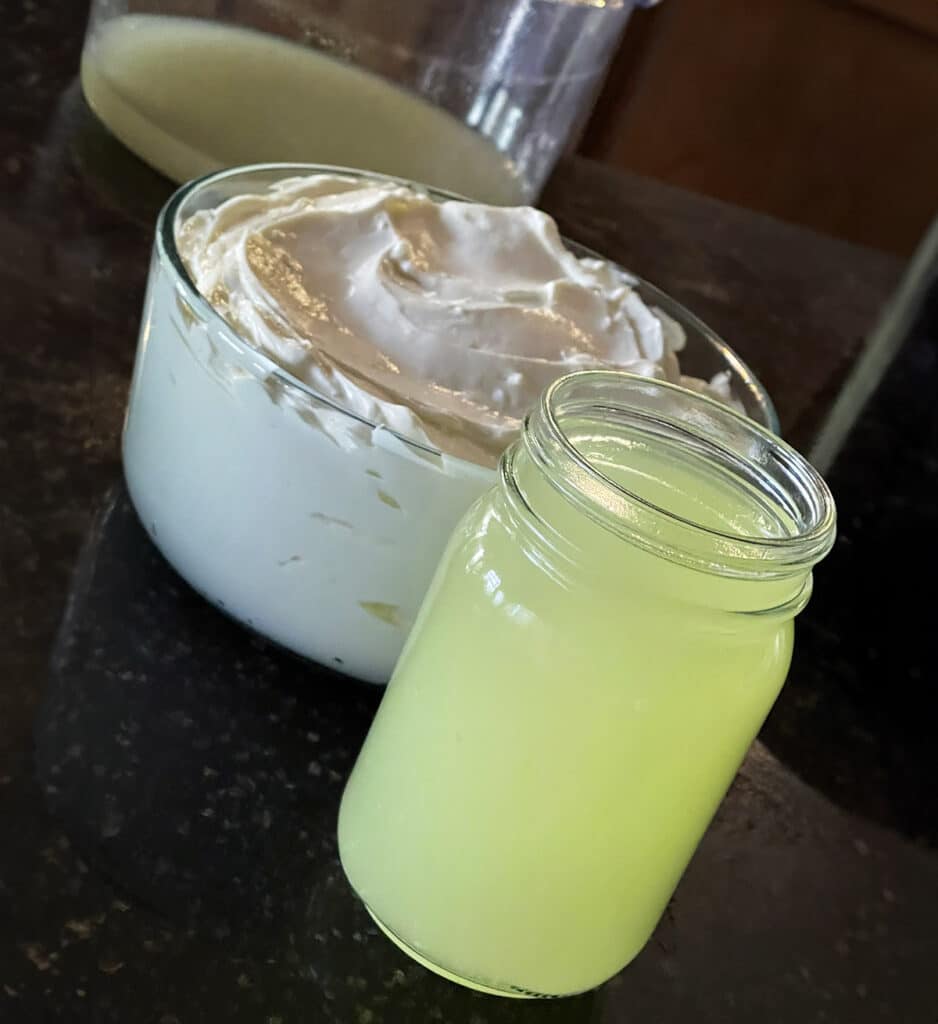
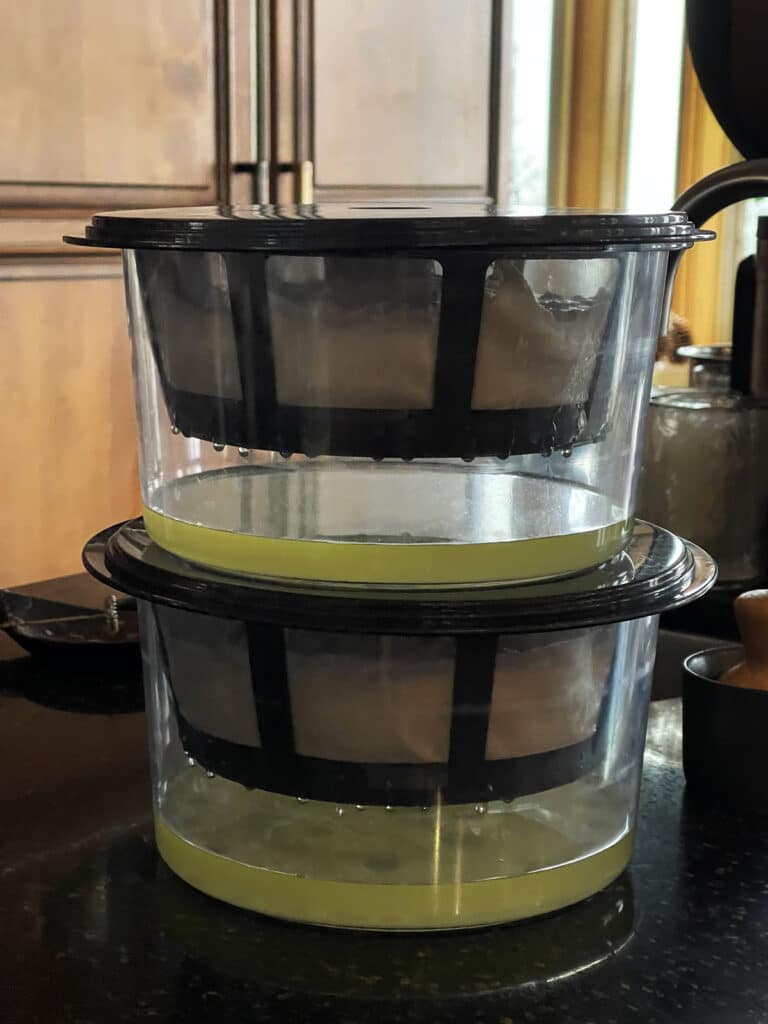
Straining is typically done by pouring the yogurt into a cheesecloth-lined sieve or fine-mesh strainer set over a bowl. The yogurt is allowed to drip for a period of time, usually several hours or overnight, during which time the whey drips out, leaving behind a thicker, creamier yogurt known as Greek yogurt. If I have the refrigerator space (or a cold porch) I often let the straining continue a full 24 hours to get the thickest yogurt I can, which in my humble opinion, is the most versatile. I like my yogurt to be impervious to gravity, lol.
While you can use any old strainer lined with a bit of cheesecloth or a nut milk bag to accomplish this, I really love my Euro Cuisine greek yogurt strainers with the stainless steel strainer baskets. Each one will handle a half gallon of prepared yogurt and they make the process of straining as easy as can be.
My philosophy is if it’s easy, I’m MUCH more likely to do it regularly.
If you want something done, figure out how to make it as easy as possible.
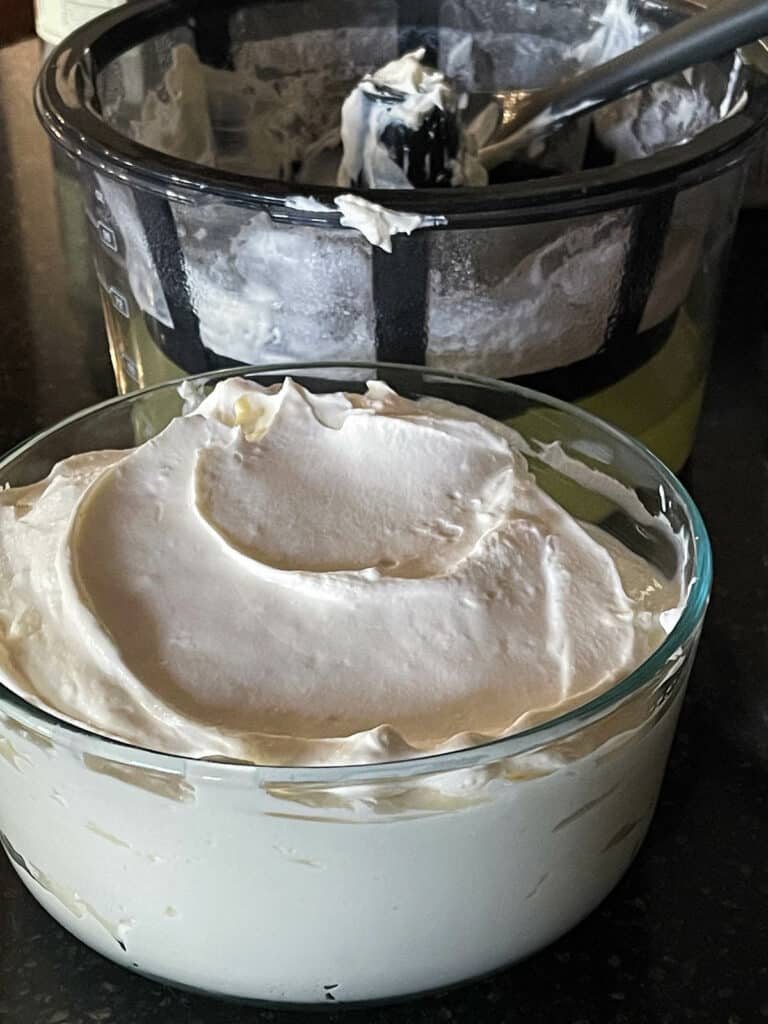
In my early days of yogurt making, I admit I was a bit distressed to see how much volume is lost when the whey is strained to make Greek yogurt, which can be upwards of 40%. For awhile I questioned whether thick Greek-style yogurt was worth “losing” almost half of my yogurt.
Reframe: You’re not losing 40% or your yogurt; you’re gaining a quart or two of highly useful fresh whey. It’s helpful to have a plan in place to use all that lovely whey. It actually has a zillion and one uses (above and beyond inoculating your next lacto-ferment project).
Stay tuned: What Can I Do with All This Whey!?