Wise Traditions & Homemade Sauerkraut

Mr. Redheaded Herbalist and I were fortunate to be able to attend the 2022 Wise Traditions conference held in Knoxville, Tennessee a few weeks ago. This was my third conference and Mr. RH’s first. If you’re into holistic health and enjoy learning practical ways to integrate ancestral dietary wisdom into our modern lives, Wise Traditions is one of the best of its kind.

Besides the lineup of insightful speakers and inspiring presentations, one of the highlights of every Weston A. Price Foundation conference is the food. You will not find your typical hotel/convention center fare at a Wise Traditions conference

WAPF staff and volunteers work with the venue’s kitchen staff for months beforehand to ensure that all of the meals served are made according to WAPF dietary principles, employing traditional methods of preparing unprocessed “nose to tail” whole foods the way humans were designed to eat. It is delicious. Meals are prepared with soaked, sprouted and fermented foods, plenty of bone broth, organ meats and, of course, raw dairy.

Notably, every meal was served with a some kind of probiotic food — often a small serving of fermented sauerkraut or kimchi, plus a cup of kombucha or water kefir.

Traditional wisdom

Not long ago, we didn’t have to look far to find probiotics in our food. For very practical reasons, fermented foods and beverages were an important part of most traditional diets.

In the days before refrigeration, fermentation was a method of food preservation by harnessing the Lactobacilli bacteria naturally present on the surface of fruits and vegetables to protect against spoilage. By encouraging the growth of the “good” bacteria at the expense of the “bad,” organic acids are formed, which lower the food’s pH and create an acidic environment inhospitable to harmful, putrefying microorganisms, thus helping to extend the food’s shelf life.

With the introduction of refrigeration technology in the early 20th century, the reliance on fermentation for food preservation decreased in industrialized countries. People could now store fresh foods for longer periods in refrigerators, reducing the need for fermenting large quantities of food to prevent spoilage.

But while modern refrigeration can significantly extend the shelf life of perishable foods, fermentation can prolong their freshness and storage life even longer. Fermented vegetables like sauerkraut or fermented beets can last for months in cold storage or even years under the right conditions.

It’s also a great way to get some probiotics and digestive enzymes into your diet.

Gut food

Humans are made up of something like 40-60 trillion cells and 100-150 trillion microbial cells. You read that right — we are more bacteria than human. We are home to 1,000 different species of microbes and 95% of them reside in our gut. This bacteria is crucial to help us to digest foods and absorb nutrients that otherwise would be unavailable.

Our bodies also require enzymes to digest, absorb and utilize nutrients from our food. Without them, we couldn’t survive. According to the National Human Genome Research Institute’s HMP program manager, Lita Proctor, Ph.D.:

“Humans don’t have all the enzymes we need to digest our own diet. Microbes in the gut break down many of the proteins, lipids and carbohydrates in our diet into nutrients that we can then absorb.”

Not only do we not have all the enzymes we need by default, as we age, our body’s supply of enzymes decreases further. So it becomes increasingly important to get them via our food.

The immune system in your gut

Hippocrates, the father of modern medicine, believed that “all disease begins in the gut.” Turns out, he was right! Gut microbiota affects virtually every aspect of human health. The intestinal tract is our largest immune system organ, with 70-80% of our immune-producing cells residing there. The terrain of our microbiome is critically important for the development (and maintenance) of an optimally functioning immune system.

Diet plays a vital role in the composition of our gut’s microbiota terrain and, consequently, shapes the immune system. Consuming fermented foods naturally supports microbiome diversity, which not only helps to maintain proper digestive function and a healthy metabolism, it directly affects our health and mood.

The microbiome is not a closed, static system and needs to be replenished regularly. The cultural shift toward hyper hygiene practices and more frequent antibiotic use, combined with the shift away from traditionally prepared fermented foods, has drastically reduced the number of microbes people are exposed to compared to past generations — and our health is suffering for it.

The act of fermenting increases a food’s vitamin content and beneficial enzymes. Raw cabbage, for example contains modest amounts of vitamin C, but turning it into sauerkraut doubles the C content. Fermenting can create new vitamins, antioxidants and short-chain fatty acids that were not present in the food pre-fermentation.

Fermenting also improves food’s digestibility by partially pre-digesting it for us, thereby reducing the stress load on our digestive system and improving the bioavailability of all those nutrients and minerals.

Some studies suggest that the act of fermenting also degrades certain classes of pesticides, suggesting the potential for lactic acid bacteria to aid in the detox of pesticide toxin buildup in the body.

After we got home from the conference, I was full of energetic inspiration and wanted to keep that momentum going. Within two hours of getting home from the airport, I’d started a new batch of kombucha (which I hadn’t made in more than a year) and also a jar of water kefir and a pint of cultured crème fraîche. Later that week, I made a batch of homemade Greek yogurt and started a whey ferment with some salsa I got from a local farm.

Gotta love that kind of motivational fire! I wanted plenty of options that would make it easier to recommit to serving some sort of fermented food at every meal.

I also started a huge, 2-gallon crock of sauerkraut.

Sauerkraut is German for “sour cabbage.” It was popularized by the Germans, but pickled cabbage preserved in rice wine (called ‘suan cai’) actually originated in China a couple thousand years ago. From there, preserved cabbage made its way to Europe and the ancient Romans, who were likely the first to make fermented cabbage using a salt brine.

Most sauerkraut you’ll find at the grocery store is pickled in vinegar and not a live probiotic food. As Austin Durant (of the Fermenter’s Club and author of his soon-to-be-released book Fearless Fermenting) noted during his presentation at the Wise Traditions conference, “All fermented foods are pickled, but not all pickled foods are fermented.”

Commercial sauerkraut brands such as Bubbies are naturally fermented and are a good store-bought option if you know you’re not going to make your own. From a flavor and economy standpoint, though, you really can’t beat homemade. For the cost of a couple of pounds of organic cabbage and a bit of salt, you can make several quarts of nourishing, probiotic kraut that tastes far better than anything you could buy.

The best part about homemade is you can customize til your heart’s content.

Try adding shredded carrots, beets, diced green apples or chili peppers.

A handful of garlic cloves? Yes please.

Fresh herbs? You know who you’re talking to, right?

Dill weed, ginger root, lemon zest, caraway seed, whole peppercorns or juniper berries are just a few of the many spice options to customize the flavor profile of your sauerkraut.

Making kraut

Sauerkraut in its simplest form is nothing more than shredded cabbage + salt. The salt works to inhibit bad bacteria, allowing time for the good guys to take over. A good rule of thumb is to aim for 2% salt by weight. This works out to roughly 3 tablespoons of salt per 5 lbs of cabbage. Remove any outer leaves that look limp or grungy and weigh your cabbages before chopping to get an idea of how much you’re working with and adjust the salt accordingly. 

I usually opt for a high-mineral salt such as Real Salt to start my ferments, but you can use any high quality, non-iodized salt with no anti-caking agents such as pink Himalayan or sea salt.

Of course, a sharp knife and cutting board is all you really need to process your cabbage. That said, if you make a lot of sauerkraut and routinely make larger batches, it might be worth investing in a cabbage board, which is basically an oversized mandolin large enough to shred a big head of cabbage. This is the one I own and it makes incredibly fast work of a processing multiple heads of cabbage.

You do not need to worry about sterilizing your equipment, but everything (including your hands) should be soap-and-water clean to avoid contaminating your new ferment with something that shouldn’t be there right out of the gate.

Place your shredded cabbage and salt into a large mixing bowl, and mix well with your hands. Now go make yourself a cup of herbal tea and let the cabbage and salt get to know each other for 15-20 minutes.

Using clean hands, massage the cabbage while the salt starts to draw out the cabbage juice that forms the brine. Don’t get discouraged if it seems to be taking awhile for the cabbage to give up its juices. Time helps this process along. Massage the cabbage for a bit then take a short break. When you come back, you’ll find that the cabbage has released a bit more of its juices. Massage some more and walk away again. When the cabbage feels good and juicy, you’re done.

juicy

Pack the cabbage and all of its liquid into your fermenting vessel. A widemouth 1 or 2-quart glass mason jar works well. Ceramic, stoneware crocks are a great choice for larger batches. Using a kraut pounder (or a large wooden spoon), push your cabbage down beneath the water line. 

Lacto-fermentation is an anaerobic process — meaning the lactic acid bacteria require an oxygen-free environment to grow and thrive. Some fermenters like to add a layer of cabbage leaves to ensure that none of your shedded cabbage is exposed to air (and the risk of mold). If you’re using a mason jar, save a clean cabbage leaf and cut it into a round to fit the diameter of your jar. 

Now add a fermentation weight to hold everything beneath the brine. My crock came with a set of split stoneware weights, but you can also use a clean ceramic or glass plate that fits inside your vessel. Glass fermentation weights work well for wide-mouth mason jars.

Once you’ve made sure all of the cabbage is good and submerged, it’s time to add a lid and walk away.

Stoneware crocks often come with a heavy lid that simply sits on top of the vessel to keep out dust and insects. If you’re using a wide-mouth mason jar, you may want to choose a lid with a built-in airlock to allow gases to escape. Otherwise you’ll need to remember to “burp” the jar regularly.

Sauerkraut ferments best at room temperature (between 65F and 70F) and out of direct sunlight (UV exposure can inhibit bacteria). If you’re using an opaque crock then light won’t be a concern, but it’s best to place clear glass jars in a dark pantry or cover them with a kitchen towel.

After a 2-3 days, take a peek at your ferment and remove any scum that has formed on the surface. Use a clean, mesh strainer or slotted spoon to skim it off. Your kraut can be ready to eat in as little as 7 to 12 days, but the flavors will continue to develop for a good 3-4 weeks. Taste as you go, and when you’re happy with the flavor, pronounce it ‘done’ and transfer to the refrigerator or cold storage.

They say we should all aim to eat seasonally, and this is a great way to do that. Cabbage is a fall season crop and is best harvested after the first frost, which makes it sweeter and more tender. Now is the perfect time to preserve those garden cabbages to feed you all winter!

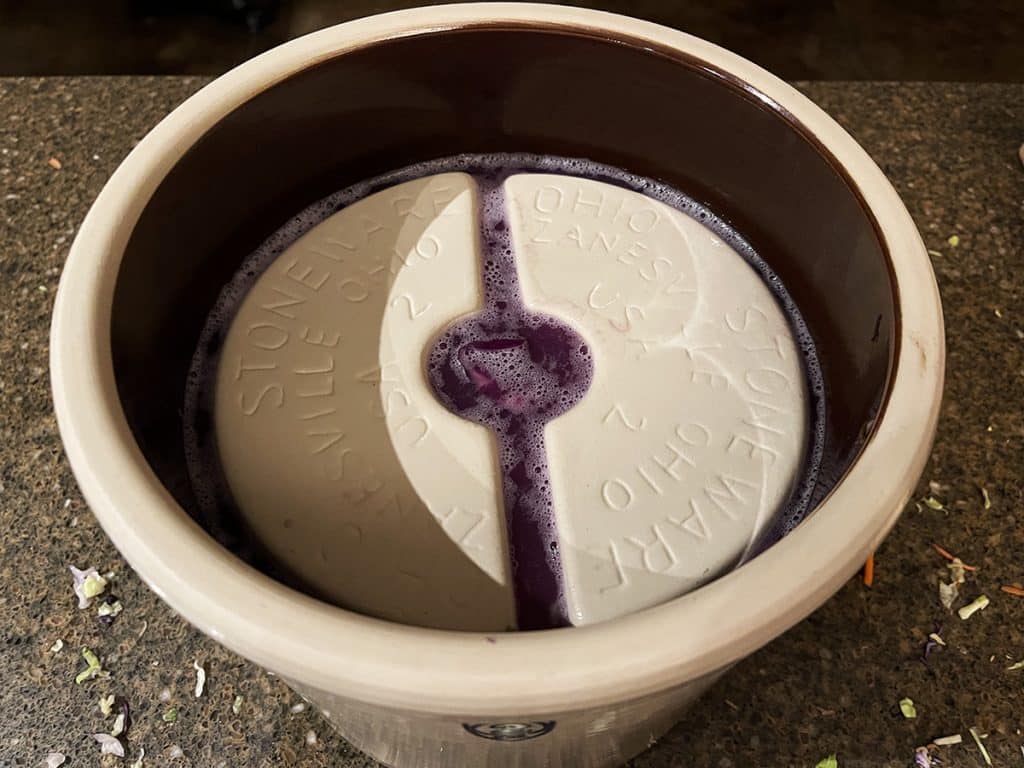
If you have access to a cold garage, root cellar or pole barn with temps around 40F, you can store your sauerkraut unrefrigerated long term. I expect my 2-gallon batch made in November to last in our cold pole barn until April or so, or whenever the temperatures start to warm up again. It will continue to ferment a bit and darken in color, but the process will be slowed down considerably by the cold. You just need to remember to check on it now and then to make sure the brine level doesn’t need topping up or to skim off any spots of white mold that may periodically form on the surface.

If you make sauerkraut in large batches like this, it truly is a make-ahead Kitchen Helper that will save you time (and money) in the long run. 

Kraut gone wrong

If you’ve used adequate salt, it’s actually pretty rare for ferments to go bad. A particularly active ferment may bubble over and the loss of brine will cause the surface to dry out. If this happens, simply mix up a bit more 2% brine (1 teaspoon salt + 1 cup of water) and top off the crock until the kraut is submerged once again. 

You will definitely need to do this if you’ve made a large batch like mine. Check on the crock periodically to make sure the brine is still covering the kraut, since evaporation will cause the brine to reduce over time, and put your kraut at risk of developing mold. In this case, just add filtered water to replace the lost volume, since the original salt is still in there.

The most common cause of sauerkraut gone wrong is using an inappropriate amount of salt. Too much salt or too little can lead to mold spotting. If you see a bit of white mold in the early stages of forming, it should be scooped out as soon as possible. If the mold is black or any color other than white, unfortunately, your ferment may not be salvageable. Toss it and start again, paying closer attention to to amount of salt required and the cleanliness of your vessel and tools.

Kahm yeast is another phenomena that may crop up now and then. If you wake up one day to find the surface of your ferment has developed a web of stringy looking… something that does not look like mold, you’ve probably got kahm yeast. It’s annoying, but harmless. Simply skim it off and consider topping off your ferment with a bit more brine with a higher salt concentration. Phickle has a great in-depth article describing kahm yeast (along with some truly beautiful photos), how to avoid it and what to do about it if you get it.

A quick note from Captain Obvious

Sauerkraut fermented in a salt brine can taste a bit…

(wait for it)

…salty. 

Shocker, I know!

You can reduce the saltiness by giving the sauerkraut a quick rinse before serving.

The more you know 🌈

Print
clock clock iconcutlery cutlery iconflag flag iconfolder folder iconinstagram instagram iconpinterest pinterest iconfacebook facebook iconprint print iconsquares squares iconheart heart iconheart solid heart solid icon

Apple-Ginger Sauerkraut


5 Stars 4 Stars 3 Stars 2 Stars 1 Star

No reviews

Ingredients

Scale

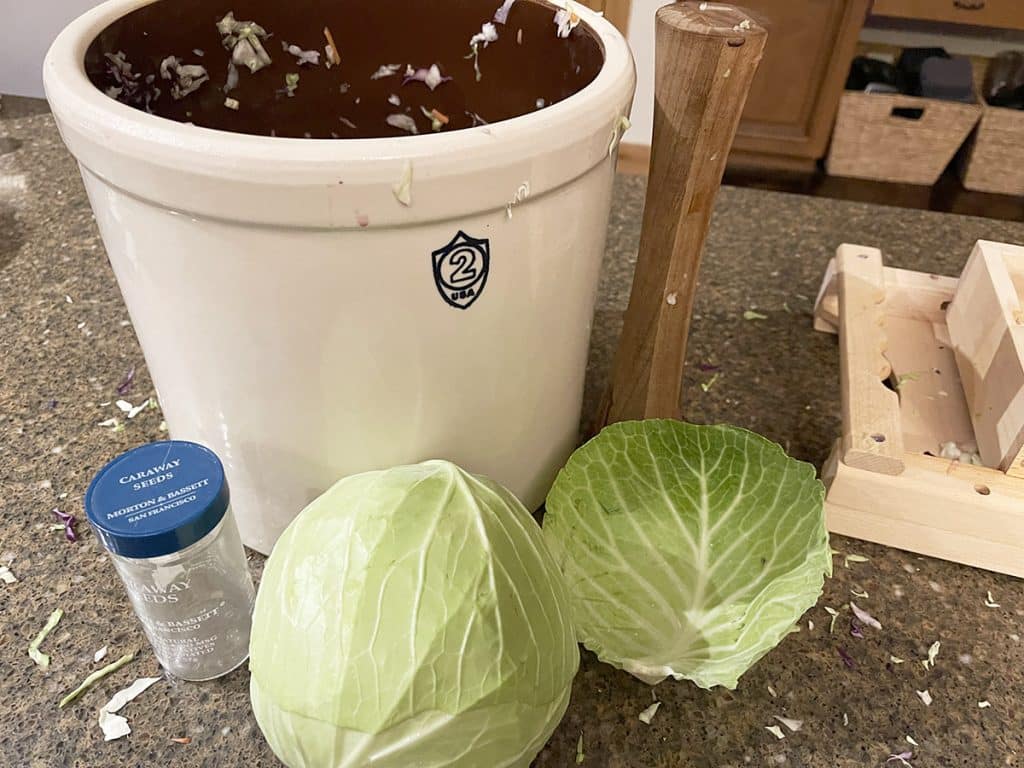
1 1/2 lbs. cabbage (green, red or a little of both)

1 T high-mineral salt

1/2 c carrots, shredded

1” piece fresh ginger, peeled and minced

1/2 large granny smith apple, diced

1/41/2 tsp caraway seeds

1/41/2 tsp dill seeds


Instructions

  1. Look over your cabbage and remove any outer leaves that look limp or grungy. Reserve 1 clean leaf for later.
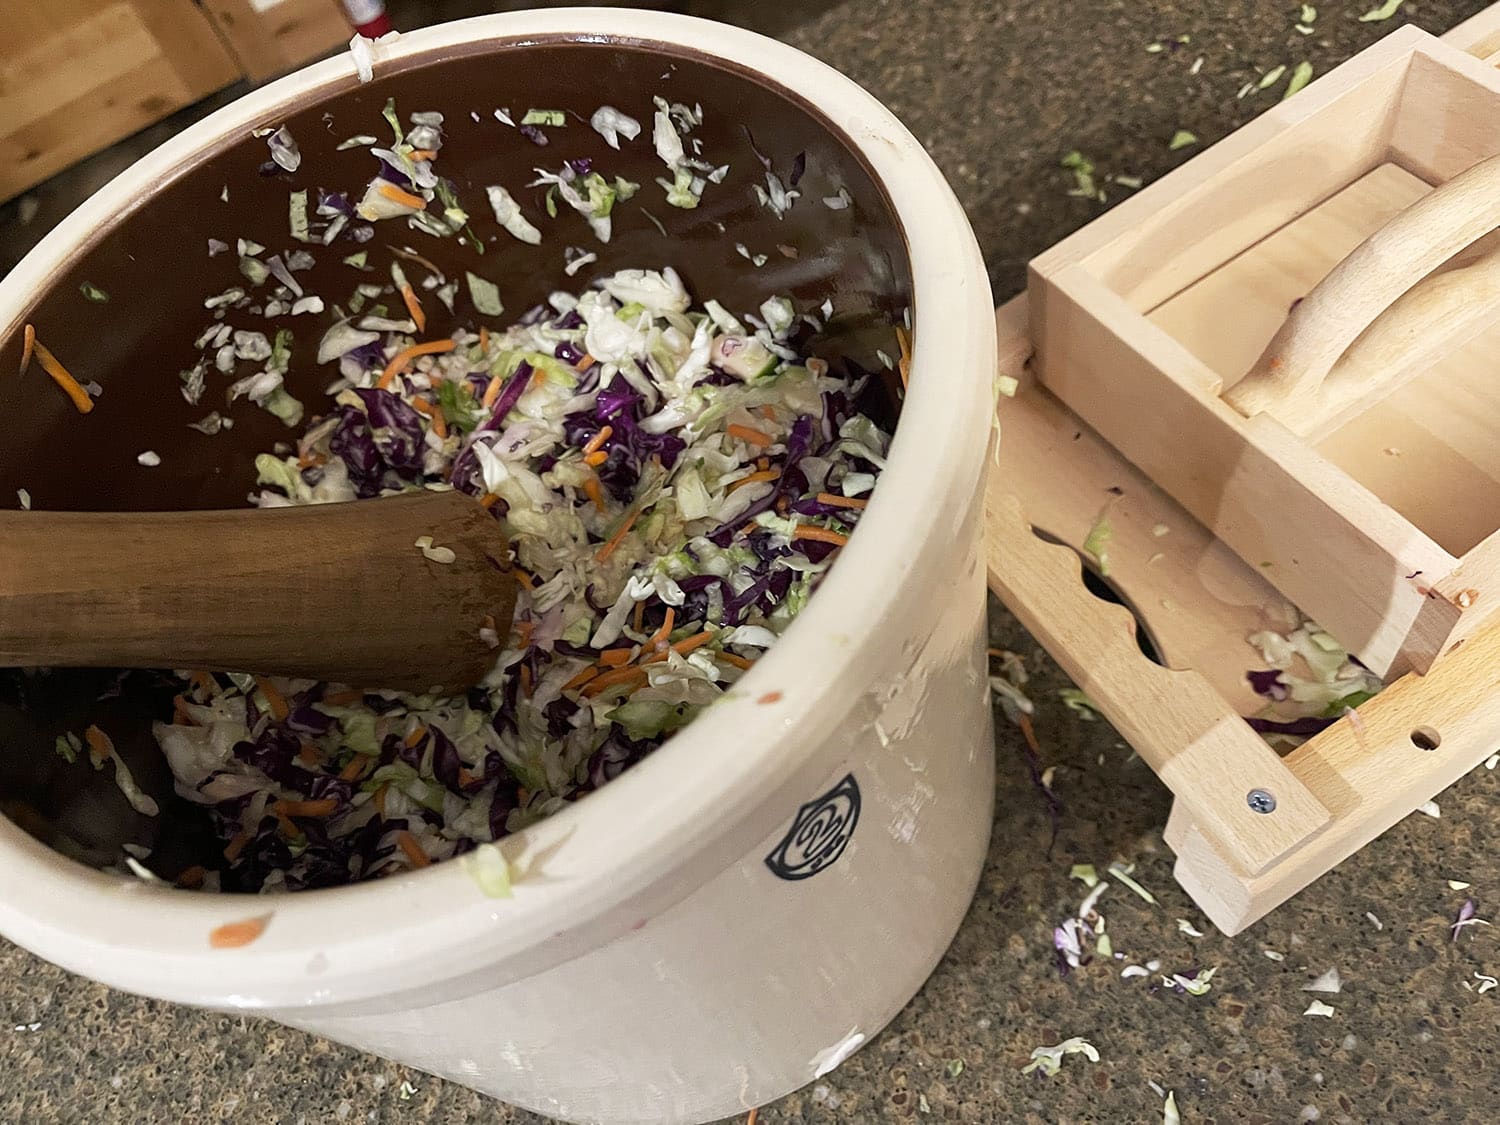
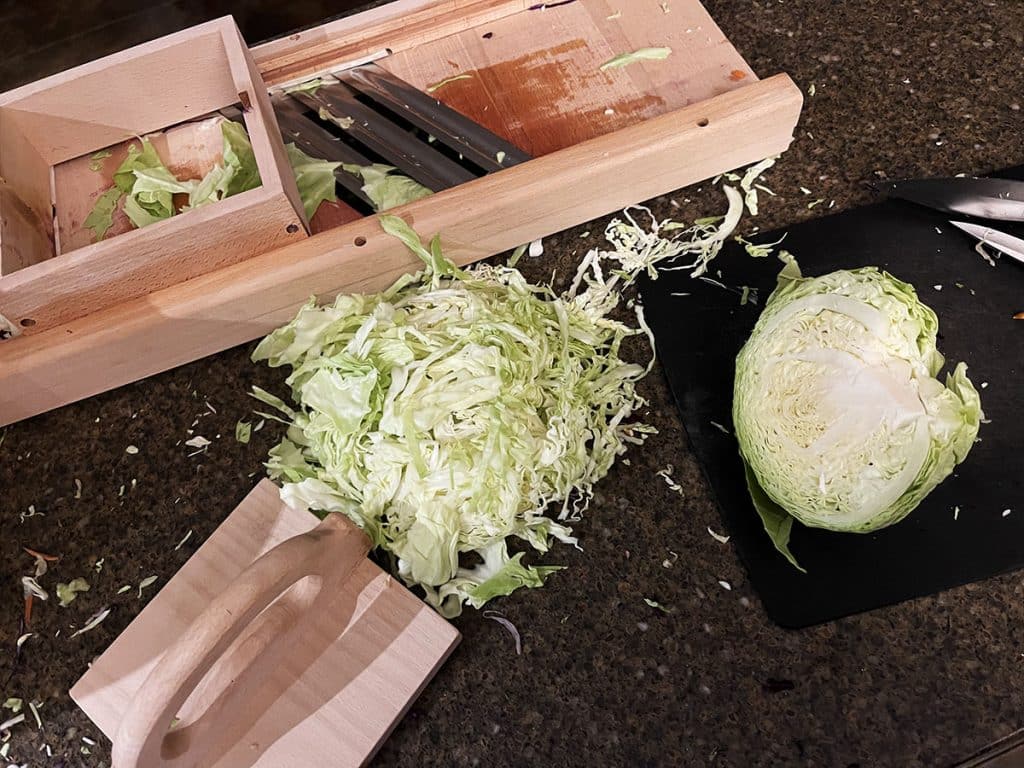
  2. Slice the cabbage head in two. Remove the core and thinly slice each half into shreds.
  3. Transfer your shredded cabbage to a large mixing bowl and sprinkle with salt; give it a quick stir to distribute the salt and allow it to rest for 15-20 minutes.
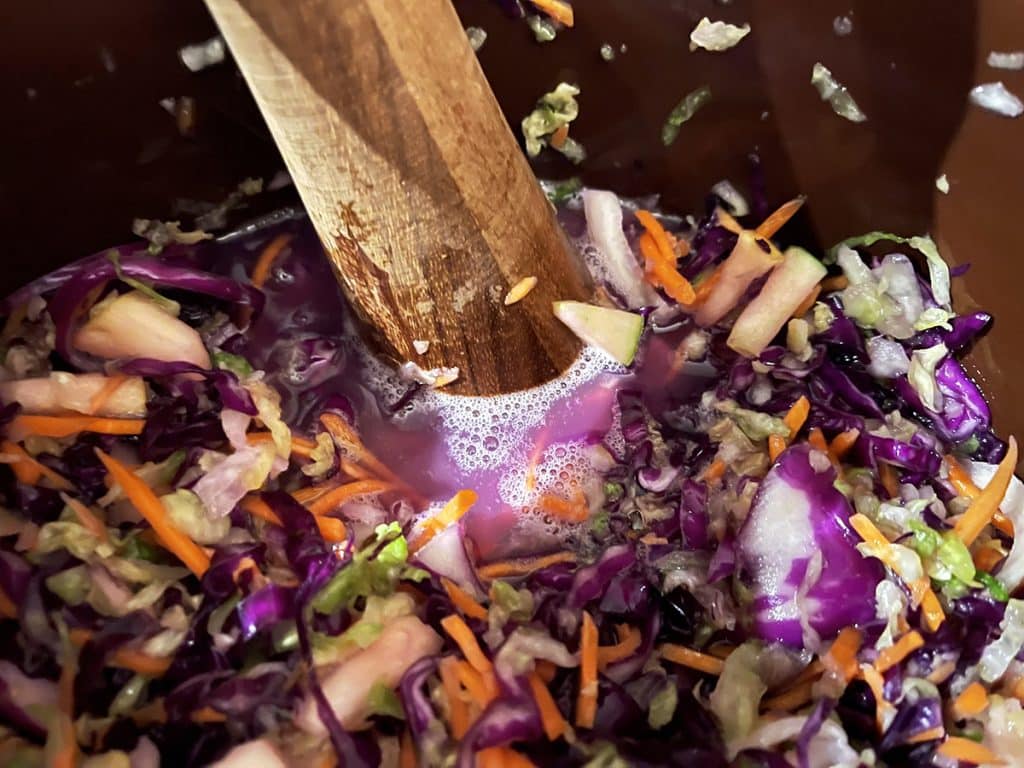
  4. With clean hands, massage the cabbage to encourage the salt to draw out the cabbage juice that will form the brine. If needed, take short breaks to let the salt work on the cabbage more. Keep massaging until the cabbage feels good and juicy.
  5. Add shredded carrots, apple, ginger and caraway seed, mixing well.
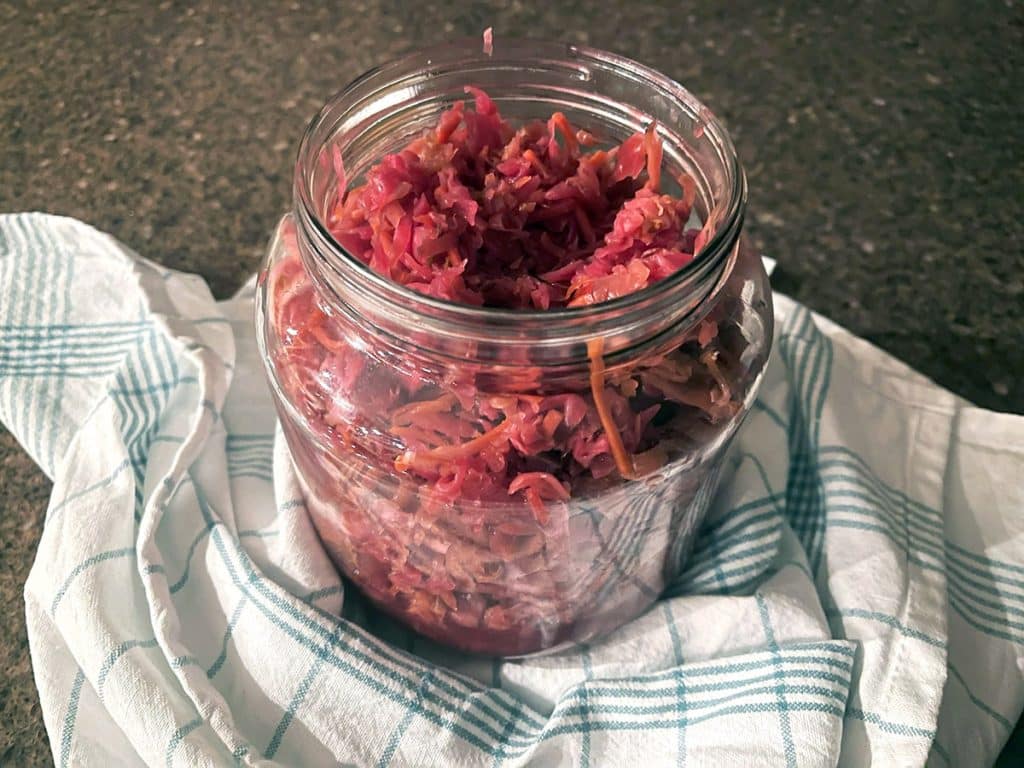
  6. Tightly pack the shredded cabbage mixture into the quart jar, using a kraut pounder or wooden spoon to press it down below the water line.
  7. Cut the reserved cabbage leaf into a round that fits the diameter of your jar and place it on top of the packed cabbage.
  8. Add a fermentation weight to keep the kraut under the water line and cover the jar with a lid (with airlock if using).
  9. Store jar at room temperature and out of direct sunlight. Remember to ‘burp’ the jar daily if you are not using an airlock.
  10. After 2-3 days, open the lid and skim off any scum that has formed on the surface.
  11. After 7 days, you can start tasting your kraut to determine when the flavor has reached a good stopping point. This can happen in as little as a week or as long as 3-4 weeks, depending on the temperature of your home and your taste preferences.
  12. When the flavor is to your liking, remove the weight and transfer to the refrigerator or cold storage. Serve a few tablespoons with meals as a nutritious (and delicious!) digestive. ♥

Notes

If you want to make plain sauerkraut with only cabbage and salt, increase the amount of cabbage used to ~2 lbs.

Disclaimer:

I’m committed to only recommending products and companies that I’m passionate about, that I personally use and trust. The content on this site may contain affiliate links. If you decide to purchase items through these links, I receive a small commission at no cost to you. These commissions help cover our operating costs to keep Redheaded Herbalist running. Thank you for your support! ♥

The content on redheadedherbalist.com is for educational and entertainment purposes only. It is not intended for medical advice, diagnosis or treatment. Claims made on this website have not been evaluated by the Food and Drug Administration.

Ready to join the conversation? 

Please be courteous! Spam and abuse of the comment section will not be tolerated.

Leave a Reply

Your email address will not be published. Required fields are marked *

Recipe rating 5 Stars 4 Stars 3 Stars 2 Stars 1 Star

Tincture Dilution Calculator

Calculate the volumes of any two alcohol proofs to create a tincture of a particular strength.

Copyright © 2024 Redheaded Herbalist

contact a

redheaded

herbalist